


How to Update Radioddity GD-88 & DB25-D Firmware?
-
 Ham Talk
-
 Posted by Jackson Chen
 -

-
 Leave a comment
In general, an update of PC-software (CPS) or radio-firmware should only be done
if it is really required, following the golden rule that "If it isn´t broken,
don´t fix it!".
Notes:
ⅰ. Prior to performing a firmware update, save the current codeplug to a file.
After doing so, the firmware update may be applied. Finally, the previously
saved codeplug should then again be written to the radio using the corresponding
CPS.
ⅱ. This firmware update guidance works for both
Radioddity GD-88 and
Radioddity DB25-D
Before update, the following items are needed:
ⅰ. Programming cable
ⅱ. Radio
ⅲ. A computer running the Windows (XP/Vista/7/8/10/11) operating system
ⅳ. Download the firmware and update tool through
Radioddity Download Page
ⅴ. Make sure the radio is with sufficient power / stable power supply
Firmware Update Steps
1.Install the Firmware Update Tool
To install the updater, just unzip the archive you downloaded from Radioddity
support and double click on the file, named "IAP(setup).exe". This will install
the firmware update program on your Windows machine and place a shortcut on your
desktop.

2. Put the radio into firmwamre update mode
ⅰ. Turn off the radio.
ⅱ. Close the CPS (in case it had been running) in order to make sure the virtual
COM-port of your programming cable is not occupied.
ⅲ. Connect your Radioddity GD-88 or DB25-D via the supplied programming cable to
your Windows PC.
ⅳ. Press the [P1]-key on top of the Radioddity DB25-D and keep it depressed. For
the Radioddity GD-88 it is the upper sidekey [P2] that needs to be kept
depressed.
ⅴ. Additionally turn on the radio either by turning the volume key clockwise
(Radioddity GD-88) or by pressing the "power key" left to the [P1]-key
(Radioddity DB25-D).
ⅵ. The status-LED will constantly light up red.
ⅶ. On the Radioddity GD-88 a special screen will be displayd with either "IAP_A"
or "IAP_B" shown in the top line. On the Radioddity DB25-D, the display will
stay blank and backlight will be on, regardless of your normal settings.
ⅷ. Release the [P1]-key (Radioddity DB25-D) or the upper sidekey [P2]
(Radioddity GD-88).
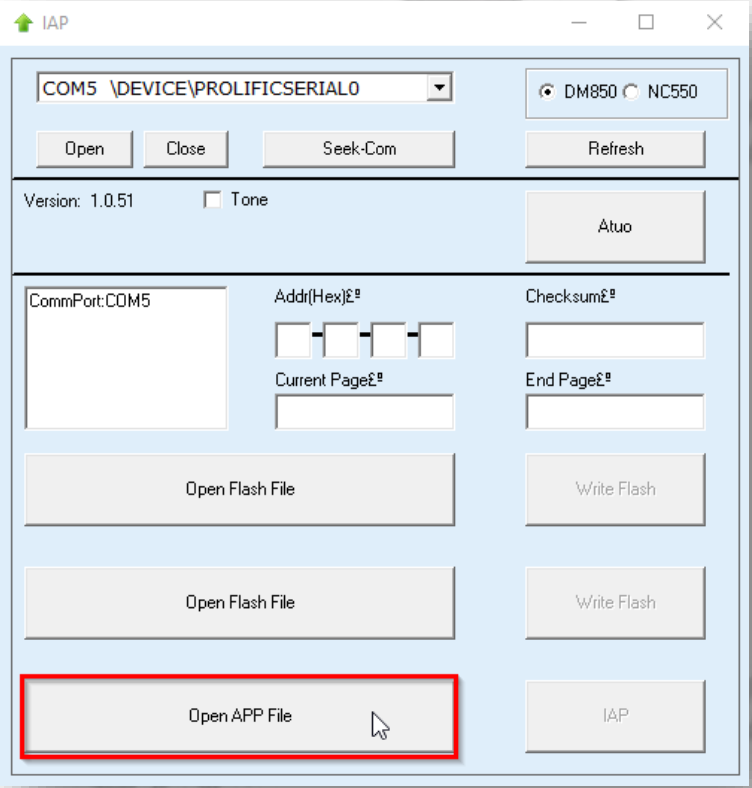
3. Start the update tool
![]()
4. Choose the virtual COM-port that does represent your programming cable

5. Click on "Open"

Note: If the update
tool connect to your Radioddity DB25-D or GD-88 successfully, it will output
"IAP Successfully". If it isn´t able to connect to the radio, it will stay on
CommPort:COM "x" (where "x" represents the selected virtual COM-port number of
your programming cable ). If you forgot to shut down the CPS, you will get a
"The COMM port is occupied or doesn't exit!" error.
6. Click on the button "Open APP file".
7. navigate to the path that does contain the update file that is intended to be transferred to the Radioddity DB25-D or Radioddity GD-88, such as:
"C7000_DR880UV_HAM_A_2022-10-27"
Note:
ⅰ. Do not use update files intended for other radios,
even if those radios may be looking like the Radioddity DB25-D or Radioddity
GD-88. Using files not intended to be put on a Radioddity DB25-D or a Radioddity
GD-88 may result in a loss of any guarantee
ⅱ. Whereas a firmware update for the Radioddity DB25-D
consists of just one file, the Radioddity GD-88 does require two separate files.
One for each independent VFO (A and B). To select the target location of the
file, long press the upper side key [P2] of the Radioddity GD-88 to switch
between "IAP_A" and "IAP_B". The firmware files are normally marked with "HAM_A"
and "HAM_B".
8. To start the actual update process, click on the ‘IAP’ button.

Note: Do not press any key on the radio, do not remove power, just wait until the radio has finished the update process and turns off! During the update process, the status-LED will flash green and red and the application shows the progress by the increasing number of "Current Page".

As soon as the update has finished on the
Radioddity DB25-D, the radio will automatically shut down, whereas the
Radioddity GD-88 will state the following on its screen "Status: Rec Done!".
If you have just updated one of the two GD-88 VFOs it is now time to select the
second VFO (long press of the upper side key) and update it with its
corresponding firmware file as well. After you have updated both VFOs of the
Radioddity GD-88, turn off the radio.
9. You may now normally power on the radio again.
To check which firmware version currently is installed, click: MENU → Device
Info → Version
he output will look similar to:

Enjoy the new firmware!
Mike
onlyh took me a few minutes once I found all the programs on my computer. Now I need to put a codeplug in, lol
W7QPC
Thank you !! Corrected the volume problem. Now on to DMR. David’s codeplug is the best.
KK0DJ Dennis
Good to have this how-to! One thing that may be adjusted is that on step 5 “note” that says ": If the update tool connect to your Radioddity DB25-D or GD-88 successfully, it will output “IAP Successfully”. If it isn´t able to connect to the radio, it will stay on CommPort:COM “x” (where “x” represents the selected virtual COM-port number of your programming cable )." – It was my experience that the display did not change to “IAP Successfully” but remained showing the COM port. Regardless, I went ahead and selected the “IAP” button and the radio firmware updated fine. I’m not sure if I may have something set differently, but it all worked ok. Thank you.73
Lee Cogburn
To the radioddity.com admin, Your posts are always a great read.