Your Cart

  • Images
  • Videos
  • 3D View

Radioddity GD-73A/E | DMR | UHF/PMR | USB Program & Charge | 3600mAh | SMS | Hotspot Use

Write a review
SKU: 28-120-519A
  • Regular price $79.99
  • Regular price $79.99 SAVE $0.00


Only 35 left in stock

CODE WARD24
Copy
Get extra 10% OFF

Note: This code is not allowed on Sale Bundles.


🎉 5% OFF for 2 packs | use code < GD73*2 >
🎉 10% OFF for 4 packs | use code < GD73*4 >
🎉 12% OFF for >4 packs | use code < GD73*MORE >

PALM SIZE DMR: Compatible with MOTOTRBO, the GD-73A features lightweight and mini size that can easily fit your pocket. The clear LCD screen and compact keypad achieve a simple but effective one-hand radio operation, perfect for business use.

3600mAh BATTERY & CUSTOM KEYS: 3600mAh large capacity battery supports 48 hours of standby time and up to 16 hours of continuous working time. You can assign 4 different functions (from a total of 21) to 2 customized keys to suit your needs.

Micro USB CONNECTIVITY & HOTSPOT USE: Comes with a micro-USB cable for both charging and programming. It is ideal for daily use and for use in combination with your personal hotspot. Please note the cable does not support Windows 11 system.

IN-DEPTH USER GUIDE: DMR requires a certain learning curve but with the very detailed user manual Radioddity provides, you can find it very easy to get a hold of this radio. Latest CPS & firmware is available on radioddity.com.

LICENSE-FREE PMR: The GD-73E is a license-free DMR with pre-programmed PMR 446 channels.

CLICK HERE to download software, manual or programming tips.
CLICK HERE to join the GD-73 Facebook group.
CLICK HERE for directions on how to get on Air with your DMR Radio.


RELATED BLOG
How to Get on Air with Your Radioddity GD-73
How to get you ready with your GD-73 in 30 minutes? Although this article can in no way replace the existing Radioddity GD-73 Extended Manual for your radio, it is intended to get you ‘on air’ the direct way in a short time. Therefore this article only describes the mandatory steps to get you ‘on air’. In order to do so, just get along the following steps: 1. Apply for and receive your DMR ID 2. Gather information about the DMR station(s) you want to operate 3. Install USB-driver 4. Install CPS Note: Before run CPS for the first time, you should install USB-driver first, turn on GD-73, then connect USB cable. 5. Create new codeplug from scratch   a. Enter your call-sign and your DMR-ID   b. Create your Digital Contacts / Talkgroups (TG)   c. Set up your Digital RX Group Lists   d. Program your Channels, and attach a Digital Contact for TX and attach a Digital RX Group List for RX to each channel.   e. Program your Zones by attaching Channels to each zone.   6. Save your codeplug and transfer it to your radio 7. Get ‘on air’ with your freshly created codeplug 1. Requesting a DMR ID To work in a DMR network, you must register for a DMR ID number. For amateur radio this can be https://www.radioid.net/ or https://register.ham-digital.org/ depending on where you live. Normally, new DMR IDs will be issued within 24 hours. 2. Gather information about a DMR station There are various sources to gather the details required to setup a channel for operating a specific station such as: https://brandmeister.network/ http://www.dmr-marc.net/repeaters.html Or just check with your local amateur radio group. 3. Installation of the USB driver 1. Locate the file ‘usblib_hrc7000.exe’ in the software package. 2. Run this program as an Administrator 3. If possible, do not save the generated .inf driver on the desktop, but place a different directory of your boot drive. 4. The driver is then automatically installed 5. Wait until the installation is complete 6. Once driver installation is complete you will see a message indicating success In case of an error, stop the installation process and then repeat the process one more time by saving the file ‘walkie-talkie-C7000.inf’ and the other files in a different location. Use Windows Device Manager to verify that the computer has loaded the appropriate driver for the device. Additional configuration of the driver is not required. If the driver does not load automatically, you can CLICK HERE to download the correct 32-bit and 64-bit drivers.   CPS and firmware updates provided by Radioddity The computer programming software (CPS) for the GD-73 is updated by Radioddity as new features are added, detected bugs are fixed or other improvements made. For updates, visit our download block at radioddity.com/pages/radioddity-download   4. Installation of the CPS Before you may start programming your codeplug using the Radioddity CPS you need to install the USB-Driver as described in the previous chapter and the CPS as described in this chapter. 1. Locate the installer for your CPS, named e.g. ‘GD-73_CPS_v1.00.exe‘ in the software package. 2. Run this program as an Administrator 3. The path (1) you want the CPS to be installed may be changed (2) before hitting the next-button (3) to continue installation of the CPS: 4. If you want to change the folder name (1) or don´t want the installer to create a startmenu folder (2), feel free to change those options before hitting the Next-key (3). 5. It is a good idea to tick the checkbox in order to create a desktop shortcut before once more hitting the Next-key. 6. The final click on ‘Install’ now installs the CPS with the settings you provided. 7. After just a few seconds, the installation process will be completed and a click on ‘Finish’ will get you right to the CPS. Congratulations, that´s it!   5. Create a code plug from scratch To begin creating a code plug for your GD-73, first read data from the radio to your PC to create a first CPS template, and at the same time save the factory data for future use. When reading or writing data to or from the GD-73, the software offers several options: Read Data To read all frequency settings and other settings of your GD-73 radio, use this option. Write Data Whenever you have made your changes and additions to the settings of your GD-73 radio, use this option to transfer your settings to the radio. Note: It is highly advised to create a code plug from scratch rather than taking a code plug from someone else.   5a. Enter Call sign and DMR ID into code plug To store your personal DMR ID into your codeplug, click on ‘Edit’ → ‘General Settings’ Note: Never operate the radio with an ID that has not been assigned to you. In amateur radio networks this can lead to the loss of your license. 5b. Create Digital contacts Up to 1024 digital contacts can be stored. These digital contacts are used for storing talkgroups (TG) as well as individual stations DMR ID numbers. Select ‘Edit’→ ‘Digital Contacts’ to edit the digital contacts. 5c. Setup Digital RX Groups Each digital channel can receive one or many talkgroups. The actual talkgroups that are able to be heard are defined in a Digital RX Group and attached to the channel. Creating a digital RX group allows you to group your digital Talkgroups (TG) into logical groups so they can be targeted later on within the channel settings.   • Up to 250 individual Digital RX groups can be created and named to identify each group   • Each group can contain as few or as many contacts as you like.   • Groups should be named with something meaningful to the user   • Only contacts that are stored as group calls can be added to a group.   • Each Digital (DMR) channel must have a Digital RX Group List, with at least the transmit Talkgroup contact for the channel a member of the group you attach to the channel.   • If you do not attach a Digital RX Group List to a DMR channel, you won’t be able to hear or receive anything on that channel. To edit these groups, use ‘Edit’→ ‘Digital RX Group List’. A typical group may look like: By clicking on the ‘Add’ button, you can now add another ‘Digital RX Group’. A click on the ‘Delete’ button deletes the displayed ‘Digital RX Group’. Note: To start with, it is a good idea to group all those digital contacts (TG) that are active on time slot 1 within the very same group and name it ‘ts1’. For those that are active on time slot 2, name the corresponding group ‘ts2’.   5d. Setup of channels To edit the channels, click on ‘Edit’ →‘Channel Information’. You can then select one of the existing channels. Name the channel is a way, that there is also some information about the talkgroup (TG) within its name. This will be very helpful in later operation. e.g. <location of station/repeater>-<talkgroup> such as ‘Cologne-262’ By clicking on the ‘Add’ button, you can add another channel. Note: It is helpful, but not essential, to have the DMR channel name indicate what TX talkgroup is assigned to the channel. Most of the fields will be prefilled with the proper values. For DMR-operation it is mainly the fields Mode, Channel Name, RX/TX frequency, TX Contact, Slot, Color Code, RX Group List that need to be aligned to the specific station you want to operate. 5e. Bundling of channels into zones A zone is a collection or group of channels. They may be grouped any way you wish, for example a zone for each geographic area, or a zone with different talkgroups for one repeater, or any other way you find useful or convenient. Once you have defined your channels, you are ready to bundle them into zones for later use. Up to 16 radio channels can be stored in one zone of your GD-73. A total of up to 64 zones are possible. It makes sense to bundle channels according to their use. For example, it makes sense to bundle all channels of a DMR repeater within one zone. Another zone could contain all analogue radio channels of a geographical region. 1. First give the zone a meaningful name (1), such as the identification of the repeater whose channels you want to store in the zone. 2. Then select from the list of available radio channels (2) on the left all those you want to bundle in that zone. 3. Click the ‘Add’ button (3) to accept each channel. 4. The added channels will then be listed in the right window (4) under the heading ‘Members’. That is all what is required. 6. Transfer the codeplug to the radio After completing all the above steps, it is adviseable to save the data locally to the PC first (‘File’ → ‘save’/’save as’) before you transfer the data from your PC to the GD-73. To do so, click on ‘Program’→ ‘Write Data’ 7. Get ‘on air’ Now you are prepared to get ‘on air’. Radioddity GD-73 Basic Operation Selecting a Zone A zone is a collection of radio channels grouped together. Your radio can store up to 64 such zones, each with up to 16 channels. 1. Press the MENU button to enter the menu. 2. Using the buttons and navigate in the menu and confirm your selection by pressing the MENU button again. 3. Select ‘settings’ in the menu 4. Then select ‘zone’ in the sub-menu 5. Using the buttons and navigate to the desired zone and confirm selection of your chosen zone with the MENU button. 6. The display now shows the selected zone in the middle. 7. The line below shows the currently selected channel in the zone. Selection of a channel Navigate with the buttons and to select the desired channel. Confirmation with the MENU key is not required here. Receive and answer a DMR group call In order to receive a DMR group call, a group (talkgroup or TG) must first be selected on the radio. Each DMR channel can be assigned exactly one group using the CPS. Receiving DMR group calls First, a channel must be selected on the radio to which a group (talkgroup or TG) is assigned. Only then can a group call be received. 1. The status LED lights up green 2. If the channel is not active, then the display shows:   • in the middle line the name of the zone   • in the bottom line the name of the selected group 3. If the channel becomes active, then the display shows:   • in the top row ‘Group’   • in the middle line, the DMR ID of the caller   • in the bottom line ‘Calling’, followed by ‘end call’ if the channel was not previously active. Answering a DMR group call 1. Hold the radio vertically, about 2.5 to 5cm from your mouth 2. Now press the PTT key to answer the call. The status LED lights up red. You can talk now. 3. Once finished speaking, release the PTT key to return to receive 4. If a response is not heard within a predetermined time, the call is terminated. Initiating a DMR group call All radios that you wish to communicate with must be on the same group. 1. Select the desired channel using the and buttons. Programming channel names with a name that associates with the Talkgroup is useful to facilitate this. 2. Hold the radio vertically, about 2.5 to 5cm from your mouth 3. Now press the PTT key to transmit. The status LED lights up red. The group name appears on the display 4. Once finished speaking, release the PTT button to return to receive. If a response is not heard within a predetermined time, the call is terminated. 5. When the call is answered, you will see the status LED light up green. 6. On the display you will see:   • in the top line ‘Group’   • in the middle line the DMR-ID of the caller   • in the bottom line ‘Calling’ is displayed, followed by ‘end call’ if the channel was not previously active. 7. If the Channel Free Indication Tone feature is enabled, you will hear a short beep as soon as the transmission has finished. 8. When the group call is over, the display changes back to the previous display. 9. A group call can also be initiated from the contacts.   For more detailed operation and programming tips, please refer to Radioddity GD-73 Extended Manual
Getting on Air with Your DMR Radio v2.2 (Updated: 2023 May)
Our engineers have been busy and did a complete review on the old version of our 'Getting 'on air' with your new DMR radio' document. The former version was already quite old and needed an urgent review. Now the archive includes not only the 40 page document that´s supposed to get you started with DMR without taking all those hurdles that normally show up. The archive also includes sample codeplugs for Radioddity GD-73, GD-77, GD-88, DB25-D, RD-5R and GD-AT10G. Besides those, it also comes with sample codeplugs for Baofeng DM-1701 and TYT MD-9600. And in order to support you on getting the required parameters in order it also includes a bunch of spreadsheets. What can you learn from this document? 1. Disclaimer 2. Make yourself familiar with DMR 3. Apply for and receive your DMR ID 4. Gather information about a DMR station 5. Install any USB-driver that might be required 6. Install CPS according to your DMR-capable radio 7. General process of creating a DMR code plug from scratch 8. Sample codeplugs Get you copy of the archive > CLICK HERE <
Beginners Quick Guide | The Basics of DMR Digital Mobile Radio (Updated: 2024)
--- by Jason Reilly Introduction: "The nice thing about standards is there are so many to choose from." I love the ironic humor in this statement; a standard should result in everyone doing things the same way in order to be compatible, and prevent having to constantly re-invent the wheel. Yet, everyone has to have their own standard! Just take two-way radio digital voice systems for example: there’s P25 phase 1 and phase 2, NDXN, DMR, TETRA, OpenSky, Provoice, and dPMR, along with a whole host of legacy digital voice modes as well. That doesn’t even consider the ham radio contenders, such as DStar, Fusion, FreeDV, some old offerings from Alinco & AOR and so on. And guess what? Absolutely none of them are compatible! Choosing what digital voice standard you'll go with can be daunting. For emergency services and government communications, P25 is by far the most dominant, there’s no doubt about that. For business & private radio, DMR followed by NXDN is the two most popular choice. In the ham radio arena, the picture is a little less clear. DStar took an early lead, but Yaesu is keen to take market share with their Fusion offering. Hams have always been keen to leverage off existing commercial equipment, and it seems the most popular commercial system adopted presently is DMR. Personally, I think DMR will take the lead in both the commercial business & private two-way radio field as well as in ham radio. This is helped in no small part by the ready availability of DMR radio equipment at prices that rival traditional analog two-way radio, and that one of the biggest names in two-way radio, Motorola, are throwing their weight behind DMR.   Motorola's SL7750 blurs the line between DMR radio and cellular mobile phone   Three flavours: There are three "tiers" or levels of functionality for DMR systems. Tier 1: The simplest form of DMR is Tier 1, which is mainly used for simplex communications, with no repeaters. The human voice is digitally sampled and compressed with the AMBE+2 codec, and then transmitted in this digital form to another radio. Tier 2: Things start to get a bit more complicated here. With Tier 2 DMR, repeaters are used in a TDMA arrangement, with two "timeslots. What this means is that two completely separate radio transmissions can be going through the repeater at the same time; each radio takes turns in transmitting in short 27.5 millisecond bursts. In addition to this, radios can be set to logical closed groups called ’talk groups’, which you can think of as ’virtual channels’. Repeaters can be linked via the internet to form networks that can be as small as just two repeaters, or thousands of repeaters across the world. Again, the AMBE+2 codec is used to turn speech into compressed data for transmission. All amateur radio DMR systems are Tier 2, as are many business / commercial radio DMR systems. Tier 3: This is effectively a trunked radio system on top of Tier 2. A pool of frequencies are used to carry the TDMA transmissions. This is used by more complex or larger networks for big businesses and commercial radio users.   The advantages of DMR: So why go to all this trouble, when plain old analogue FM works perfectly well? DMR has the advantage that it four times more efficient when it comes to spectrum usage. For one 25 kHz analogue FM channel, you could fit four DMR transmissions. Not only that, but DMR offers some very flexible calling facilities - you can call one person, a group of people, or everyone in your fleet at once. While not every DMR network supports it, sending of data and short messages is also possible. DMR is also designed to be easy to network, with connections using IP, so creating wide coverage areas using a network of DMR repeaters is already built-in; cover your city or cover the entire country! Yet another advantage is because a DMR transmitter is only turned on about half the time due to it transmitting in bursts, battery life is longer.   TYT's hugely popular MD-380 can be bought for around $100   Some DMR Jargon: Colour codes: Every DMR transmission uses a "colour code" which is very similar to CTCSS or PL tones in the analogue radio world. On a repeater or simplex frequency, every radio must use the same colour code to be able to communicate together. The main use for colour codes is for where two repeater coverage areas on the same frequency may overlap, different colour codes are used to ensure each radio accesses the correct repeater. Timeslot: For Tier 2 and 3 systems, a timeslot is a slice of time, about 30ms long, that a radio can transmit in, or receive in. There are two timeslots per frequency, and you need to have your radio configured for the right colour code for the repeater, the correct timeslot and correct talkgroup for you to be able to hear anything. Zones: This is simply a collection of channels & talkgroups, all grouped together in one "zone" or bank. A radio user can switch zones to access a different lot of channels & talkgroups that they may wish to use. Typically a zones are divided into repeaters for different areas, so you might have one zone for the west side of a city, and another covering the east side of the city - but there's nothing to say that you must set up a zone that way. Code Plug: This is a Motorola term that has stuck over the years, and in the DMR context means a complete configuration file of channels, talkgroups, zones, contacts etc. for a radio. The code plug can be saved to computer disc, and is used to program a radio to give it the functionality a user requires. CPS: Another Motorola term, meaning Customer Program Software. Simply put, this is the software you’d use to create a "code plug" and configure your radio. Hotspot: A small box that connects to the internet and acts like your own personal low power DMR repeater, useful if you're not in range of a DMR repeater to access. You can even take them with you and use your cell / mobile phone wireless data to connect the hotspot to the internet and be able to use DMR anywhere you get cellular signal. Most hotspots are multi-mode, handling not only DMR but DStar, Yaesu Fusion and P25 as well. ZUMspot, Jumbospot, Openspot, MMDVM etc are all examples of hotspots that you can buy or build yourself.   Radioddity GD-77, dual band, DMR & FM, I think the best bang-for-your-buck DMR portable, also around $100   So what's in it for me? The use of DMR in radio hobbyist circles falls into two categories: ham / amateur radio and scanning receiver use. Lets take a quick look at each: Ham radio: Hams have long taken advantage of surplus, second hand, or even new commercial radio equipment and re-purposed it for their own use, and DMR equipment is no exception. Worldwide, DMR enabled and connected repeaters are appearing and are interconnected to provide a huge linked network spanning the entire globe. Depending on the talk group selected, you could be communicating just around town, across your region, across the entire country, and some groups even cover the world. Motorola DMR equipment is frequently used, but increasingly the cheaper units, in particular TYT, have increased the affordability and availability of DMR equipment to the mass market. In some cases, you can get on air to the DMR scene for less than a hundred dollars! Scanning: As the world relentlessly marches on to a digital future, many businesses and commercial interests have migrated their legacy analogue FM two way radio systems to DMR. There are scanners available that can hear DMR, enabling the scanning hobbyist to continue to listen to such transmissions. For those hobbyists who can’t justify the high price tag of those scanners to listen in to DMR, there are other alternatives: certain computer software can decode DMR with a regular scanner and a ’discriminator tap’, or a ’virtual audio cable’ if using an SDR, or if portable DMR reception is desired, an entry level DMR transceiver from TYT or Radioddity will do the job very well - to keep yourself on the correct side of the law, you should disable any transmit capabilities of these transceivers.

Note: For the first time running GD-73's programming software, please make sure that you've installed the driver successfully and connected the radio to your PC, or it will be failed.


1

About Radioddity GD-73A

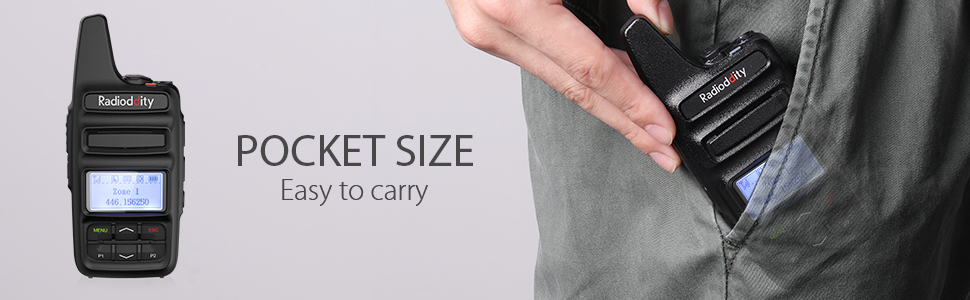
The GD-73A is a full-featured pocket DMR to take with you everywhere, featuring customizable side keys, 1024 channels, 3600mAh battery, digital & analog mode, high gain built-in antenna, easy-operation keypad, a mini body, a micro-USB cable for both charging and programming. It is a powerful and professional DMR for your daily outdoor and indoor operation. FCC & CE certified.

The light-weight portability, high capacity battery, and user-customizable design all make it the perfect radio for both experienced and new HAM users.

How to Program Radioddity GD-73A? - CLICK HERE to get programing software and guide.

1


The difference between GD-73A and GD-73E

Difference GD-73A GD-73E
Frequency UHF 406.1-470MHz PMR446 (license-free)
Power 2W/0.5W (high-low power) Fixed 0.5W

Q: Why is there no license-free feature for the US version?
A: FRS DMR is illegal in the US.

Q: Is GD-73 a dual time slots radio?
A: Yes, it's dual time slots and supports tier II.

Q: How many contacts can I save in the flash memory?
A: Up to 1024 digital contacts.

Q: Does it apply the same CPS or codeplug as GD-77's?
A: Nope.

Highlight Features


1 1
 

License-free PMR (GD-73E only): Equipped with fixed pre-programmed PMR 446 channels.

High-low power (GD-73A only): The output power can be switched between "High" with 2W and "Low" with 500mW for each channel.
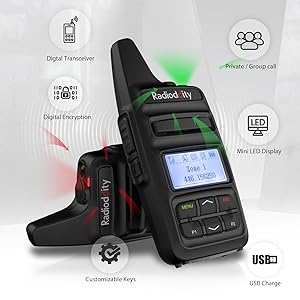
Analog & digital modes: You can switch the working mode anytime to meet your different using requirements.

Ideal for hotspot use: The GD-73 is ideal for normal use and for use in combination with your personal hotspot.

Range Max Receiver: An advanced radio design and patented antenna which delivers enhanced range up to 8km (5 miles) while maintaining a slim profile and long battery life.

Short Messaging Service (SMS): GD-73 can send and receive short text messages with a maximum length of 73 characters each.

▸ Compatible with MOTOTRBO

▸ 1024 channels and 64 zones

▸ Group call, private call, all call

▸ Digital encryption

▸ Wide/narrow band selection (analog mode)

▸ Programmable CTSS/DCS, Squelch, TOT, VOX, Encryption, Keypad Lock, Radio ID, Scan, etc


Radio Features


 111
 

FCC & CE license certificated.

Mini size and light weight: 4.5’’x 2’’x 1.3’’ (115mm x 50mm x 32mm), with only 0.33lb (148g).

LCD backlight screen and compact keypad: Easily learn the radio situation and convenient operation through several buttons.

2-in-1 function micro-USB port: This time we combine both charging and programming functions into one USB port, this will greatly enhance the convenient use of the radio.
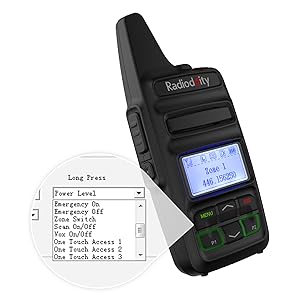
2 customizable keys: The GD-73 has two functional keys. Each can be assigned with a total of two functions like Activate, Monitor, Emergency On/Off, Scan, VOX, Push to Talk and so on, giving a total of four functions possible.
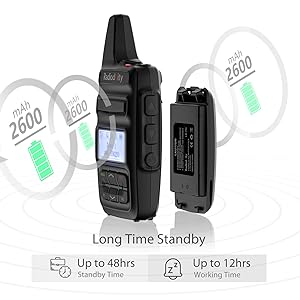
3600mAh Battery: Supports 48 hours of standby and up to 16 hours of continuous working time.

IP54 Rated: Rugged and reliable, the GD-73 is splash proof and dustproof for use in harsh environments
 

Specifications

General

Frequency range: GD-73A: 406.1-470MHz | GD-73E: PMR
Number of channels: 1024 (in 64 zones of 16 channels each)
Channel spacing: 12.5kHz (Digital Mode)| 25 KHz/12.5 KHz (Analog Mode)
Operating voltage: DC 3.6V
Battery capacity: 3600mAh standard Li-Ion
Working temperature range: -30℃~+60℃
Storage temperature range: -40℃~+85℃
Antenna impedance: 50Ω
Audio output power: ≤1W @16Ω
Dimensions (H*W*D): 115mm* 50mm * 32mm
Weight: 148g

Transmitter
RF output power: GD-73A: ≤2W | GD-73E: ≤500mW
Frequency stability: ±1.0ppm
Adjacent channel spurious: ≤60dB
Free Time Slot Power: TDMA ≤ -57dBm
Hum and Noise: -40dB@12.5kHz
Spurious Radiation: Antenna 9kHz - 1GHz ≤-36dBm | 1GHz – 12.75GHz ≤-30dBm
FM-Modulation: 12.5kHz: 11K0F3E
4FSK Digital Mode: 12.5kHz (data only): 7K60FXD | 12.5kHz (data + voice): 7K60FXE
Modulation Maximum Deviation: 2.5kHz@12.5kHz
Nonactive Slot Power: ≤ -57dBm
Digital Protocol ETSI TS 102 361-1 -2 -3
Vocoder Type: AMBE+2TM
Audio Response: +1dB~-3dB
Modulation BER (Bit Error Rate): ≤5% 

Receiver
Analog sensitivity: 0.35µV/-116dBm (20dB SINAD) | 0.22µV/-120dBm (Typical)
Digital sensitivity 0.3µV/-117.4dBm (BER 1%) | 0.22µV/-110dBm (BER 5%)
Co-channel rejection: ≥-12dB
Adjacent Channel Selectivity: TIA603C: 65dB | ETSI: 60dB
Spurious Response: TIA603C: 75dB | ETSI: 70dB
Audio output power: 1W
Audio response: 1dB~-3dB
Rated Audio Distortion: 3% (Typical)
Spurious Radiation: Antenna: 9kHz - 1GHz ≤-57dBm | 1GHz – 12.75GHz ≤-47dBm
 

Package Content:
1 x GD-73A/E Radio
1 x Li-ion battery
1 x Belt Clip (with two screws)
1 x Programming Cable (available for charging)
1 x Power Adapter
1 x Earpiece
1 x User Manual

Note: The equipped programming cable does not support the Windows 11 system.


1 Year and 6 months
Manufacturer's Warranty.
• This warranty from Radioddity covers all new items (except Xiegu brand) purchased from radioddity.com. For purchases made through other platforms like Amazon, eBay, and Walmart, we offer a 1-year warranty period from the date of purchase. The specific warranty terms may vary depending on the authorized dealer.
• This warranty cannot be transferred. You need to provide proof of purchase from us or an authorized dealer to avail warranty service.
• For Xiegu brand items, we offer a 1.5-year warranty for the G90, X6100, and X5105 models starting from September 14, 2022. All other models come with a 1-year warranty.


What Does This Limited Warranty Cover?

We warrant that the Products are free from defects in materials and workmanship under normal use and use in accordance with the respective Product user manual, during the Warranty Period. Please refer to the Instructions inside each package for a description of proper use and care of the unit.


What Does This Limited Warranty Not Cover?

This limited warranty does not cover damages directly or indirectly arising or resulting from or during:

(1) accident, misuse, abuse, vandalism or acts of God (including lightning and other weather conditions)

(2) use with another product or other damage or loss suffered by the use or combination of any other item

(3) improper or inadequate maintenance

(4) repairs by an unauthorized service technician

(5) normal wear and tear
 

Open Box

Open Box items are products that have damaged packaging or are otherwise not suitable to be sold as new. All items are tested to be working by a member of our team.

Open Box items come with a 6-month warranty instead of the standard 18 months warranty and are not eligible for any warranty extension offered to new products. We will not accept returns of Open Box items due to cosmetic damage or other non-performance-related issues. All sales of Open Box items are final and not eligible for a return or refund.

If for some reason the item is defective on arrival, please contact
support@radioddity.com so we can arrange a replacement.


If you are satisfied with our products and service, please kindly leave us a positive product review. Any problem, be free to contact us support@radioddity.com
We strive to answer all emails as quickly as possible, but due to high email volume, it may take time for us to reply. Thanks in advance for your patience!

Order Processing

All orders are processed within 1-2 business days after we receive your full payment, excluding weekends and holidays.

As soon as your order is ready, we’ll update the tracking number and send it to you if you’re a Radioddity Member. We highly recommend that you register as a Radioddity Member here. If the item you ordered is temporarily out of stock, our customer service team will reach out to you. You can choose to wait until the item is back in stock or cancel your order.

Please be aware that we have several distribution centers globally. Therefore, your orders may be shipped from various locations including the United States, Canada, Europe, or China, depending on the availability of the product in our inventory.
 

Flat Shipping Rates
 

Country

US

EU

Outside US & EU

  Free when order amount ≥ $99.99 Free when order amount ≥ $99.99 Free when order amount ≥ $99.99

Flat fee

$9.99

$9.99

$9.99

Ship from

➤ United States
➤ China

➤ Germany
➤ China

➤ China

Handling time 1-2 business days 1-2 business days 1-2 business days

Delivery time

5-7 business days

5-7 business days

7-15 business days

Note:

1. Customs fee included for US & EU countries.

2. Please note that taxes will be applied to shipping rates. These taxes will be calculated and added to your total at checkout.

3. US Shipping does not include Alaska, Hawaii and Puerto Rico area. Please contact us for a detailed shipping fee to these areas.

4. For EU countries, please be aware that the listed product prices do not include VAT.

5. For shipping options to other countries, please visit our EXPANDED INTERNATIONAL SHIPPING page.

6. Please be aware that for outlet items, pre-orders, and open box items, the shipping services and charges may vary.
 

How Do I Change The Shipping Address Or Cancel My Order


Contact support@radioddity.com (CLICK HERE) immediately if you need to change the shipping address or cancel your order. Please be advised that some orders are shipped very soon after placement and it will not always be possible to make changes to the shipping address and/or cancel the order.


Frequently Asked Questions


1. What forms of payment do you accept?
Radioddity.com currently accepts PayPal* or credit card for all orders.
*When purchasing with PayPal, your shipping address will automatically default to the address on file with PayPal, regardless of the shipping address you enter on your Radioddity.com order.

2. Why has my credit card payment failed?
Payment with a credit card may fail because of bank authorization and fraud prevention systems. If you are having trouble making a payment via Credit Card, you may contact your card issuing bank or PayPal directly. Here are PayPal's phone numbers:
+1-888-221-1161 (US & Canada Toll Free) +1-888-215-5506 (US & Canada Toll Free)
+1-402-935-7733 (International) +1-402-935-2050 (International)

3. How do I know if it is safe to shop with you?
Radioddity.com takes great pride in offering a safe and secure online shopping experience. We also respect your privacy and we're committed to protecting it.

4. Is there any discount for bulk/volume purchases?
Radioddity does provide discounts for some bulk/volume purchases. Please email our customer service for more details.

5. Do you ship internationally?
Yes, we do! We ship to US & EU countries. For some products, we ship to CA.

6. How can I contact Radioddity.com for additional assistance?
Email Customer service:
please email us via support@radioddity.com, and we will respond to your email as quickly as possible, usually within 24-48 hours.

7. How are warranties handled?
Repairs on defective merchandise are handled by the manufacturers and not by Radioddity unless otherwise indicated. If any item arrives damaged due to shipping, immediately contact the courier. Keep all shipping materials and contact us immediately.

8. Why didn't I receive an order confirmation email after my PayPal payment is completed?
We send a confirmation email to your primary PayPal email address or the e-mail address you have specified if you used the "PayPal Express Checkout" method. Make sure that you have a Radioddity account registered under your PayPal account's primary e-mail address.
In rare circumstances, a technical bug confirmed by PayPal can get in the way. If you do not receive any information at all, and your order does not appear in your Radioddity account, please contact us and send us your order details.

9. How do I change the shipping address or cancel my order?
Please contact customer service immediately if you need to change the shipping address or cancel your order. Please be advised that some orders are shipped very soon after payment and it will not always be possible to make changes to the shipping address and/or cancel the order.

10. What does Radioddity.com charge for shipping order and how long will it be before I receive my order?
Please CLICK HERE to learn about our shipping policy.

11. Do you ship to PO boxes or Military APO/FPO addresses?
Only USPS can ship to both PO Boxes and Military APO/FPO addresses. The items have to be less than 2kg. Please allow additional time for orders to be shipped to these addresses. Express shipping cannot be sent to both PO Boxes and Military APO/FPO addresses.

12. Why am I unable to track my order?
It can sometimes take 24-48 hours or so for tracking information to update once an order has shipped from our warehouse.
Occasionally, a package may not receive the proper origin and transit scans while on its journey to you, so neither us nor express is able to track the exact location of the package in transit.
Please email us if you do not receive your order by the end of the quoted time frame. Please note that orders shipping via UPS can be delivered as late as 9:00 pm local time in some areas.

13. Taxes, Customs, & Duties
If the package is checked by your country's customs office when the item arrives in your country, most websites are declaring that you are responsible for import duties, tariffs, and taxes. However, Radioddity will be happy to go fifty-fifty with customers. Quality customer service is our highest value and we try our best to reduce our customer’s loss.

14. How do I return products if I am unsatisfied?
Please CLICK HERE to learn about our return policy.

15. What do I do if received the wrong item?
Return the wrong item. If the item you received is completely different from the one you ordered, please contact our Customer Service with photos or videos of the different product. If a return is necessary, replacement plus return shipping cost will be issued to you on receiving the returned product. Or if you decide to keep it, we will offer a 10% discount for buying it.

16. How do I return defective items?
If your product turns out to be a defective one with physical damage within 30 days from the initial receiving date. You can mail the item back in the original package without any wear and tear for a free replacement. However, you will need to provide photos and videos showing the defect(s) of the product.
*NOTE: We strongly recommend obtaining and saving your return tracking number until you are notified that we have completed your refund.*

17. When will a replacement be sent?
Replacements are treated the same way as that of new orders -- they typically arrive in 10 to 13 days. If a product needs to be returned for replacement, the replacement is sent after receiving the returned item.

18. How long does it take for me to get a refund?
It may take 1 or 2 weeks for your return to reach our warehouse. Once it is received and inspected (usually within 72 hours of arrival) your refund will be processed and automatically applied to your credit card or original method of payment within 2 days. Please note that depending on your credit card company, it may take additional 2-10 business days after your credit is applied for it to post to your account.

USD