Your Cart

Radioddity GD-88

Rewrite the Rules of DMR Handheld

7W | Digital & Analog | VHF & UHF

GPS

Repeat

3000mAh

300K

Radioddity GD-88 DMR Radio | Max 7W | Analog & Digital | VHF & UHF | GPS / APRS | Cross-band Repeat | SFR | 300K

Write a review
SKU: 715-RD-GD88-A
  • Regular price $219.99
  • Regular price $219.99 SAVE $0.00


Current Stock Status
United States
Europe


◆ FCC ID: 2AN62-GD88

◆ Disclaimer: No License is required to purchase this radio, nor to Monitor (listen) to the many Amateur (Ham) Radio frequencies. However, an FCC License is required to Transmit (Talk) on Amateur Radio Frequencies in the USA. Please visit http://wireless.fcc.gov/services/amateur/licensing to learn more.

CLICK HERE to download manual, extended manual (>200 pages).
CLICK HERE to learn about the more friendly CPS - Codeplug Editor for GD-88.
CLICK HERE to join the GD-88 Facebook group.
CLICK HERE for directions on how to get on Air with your DMR Radio.


RELATED BLOG
Product Review - Radioddity GD-88 Dual VFO DMR Radio
On: April 1, 2023 By: Herbert W. Smith This review discusses the Radioddity GD-88 DMR dual band HT. After a few weeks taking some time learning its features I will say this radio checks a lot of the boxes! The Radioddity GD-88 is a dual Band 2m and 70cm digital DMR and analog handheld transceiver that includes some great features and specifications and is a solid built ham HT. • Powerful new DMR HT is an Enhanced OEM product that is a much enhanced and improved version of the generic base unit that ships from China. First, take a look at the shipping booklet, page 19 and notice that this radio was manufactured with a programmable memory reachable as Menu section #12 and referred to in the documentation as “User defined Mode”. Radioddity, working with the OEM has so far implemented twenty-one (21) options and settings all unique to the Radioddity branded GD-88. Section #12 is totally custom written and is now referred to as “Channel Edit”. The GD-88 continues to evolve, adding new features like Talker-Alias, Single Display VFO mode, analog DTMF added recently in the March 2023 firmware upgrade. The GD-88 is a current product that Radioddity continues to enhance and support • In the box - Radioddity includes all the usual expected things     ➯ GD-88 comes with a dual base charger that allows for the radio to be placed on charge while charging a second battery at the same time.     ➯ VHF 136–174 MHz and UHF 400–480 MHz Digital and Analog means broad frequency flexibility in the field among hams local and international.     ➯ User Manual in the box is a 56 page glossy well written book in clear English.     ➯ Extended In-Depth Manual is a whopping 208 pages and is available for PDF download at the Radioddity site. The Extended Manual follows the Radioddity process of continually updating the Extended Manual as feature and firmware upgrades are released. As a guide book and somewhat of a text book, it is super packed with in-depth explanations of features and improvements and covers even more details then there was room for in the shipping manual. Not only is the Manual a most excellent Digital HT guide, it also has Quick Start sections and current technology examples like connecting the GD-88 to a popular hotspot. Inexpensive hotspots can be purchased for less than $40 and with the free Blue DV desktop software will allow the GD-88 to communicate with other Ham’s across the World Wide community. I can’t say enough good things about this book, I definitely would recommend getting the PDF download. • Physical Layout Knobs and Buttons are professionally laid out with a front color LCD screen, programmable function buttons and a numeric keypad with the zero key in the right place.     ➯ Top Knobs are channel changing knob and a combination on/off and volume control.     ➯ Antenna connection is similar to more expensive radios and is an SMA female.     ➯ Programmable buttons are very useful for allocating frequently used functions such as Zone change, Power levels etc. and to disconnect contacts when using digital hotspots.     ➯ Speaker/Mic jack cover is a little rubber flap on the right side of the radio.     ➯ Programming Cable plugs into same Speaker/Mic holes. The USB programming cable is the familiar K-style and is included with the GD-88.     ➯ PF2, PTT and PF1 are three buttons on the left side of the radio in order top to bottom. PTT the larger dedicated button. PF2 and PF1 are programmable with Short and Long press.     ➯ PF3 an Orange programmable button next to the Channel knob (Short, Long also).     ➯ PF4 located on the front keypad just above the [1] key is programmable (Short, Long).   ➯ Battery is a 3000 Milliamp power battery with built in battery saving feature and has the ability to turn off the second VFO when not needed. Full discharge time can be reduced if utilizing both of the VFO transceivers and/or with excessive talk time.   ➯ Two VFOs for Dual Watch and Dual Monitor. The GD-88 has 2 separate transceivers both usable at same time, even on same band. Separate powerful dual transceivers switchable between High (7.1 watts Digital, 6.1 watts Analog) and Low (1.3 watts Digital and 2.6 watts Analog)   ➯ GD-88 comes with a dual desktop charger allowing you to charge your radio while the charger also has a second slot to charge a spare battery at the same time. A second battery is often bundled with the GD-88 and in any case it’s usually only about $30. I couldn’t resist not using that second charge slot. I often use the GD-88 at home connected to my hotspot. Some days, the battery fully depletes and it is handy to just reach over and grab the spare fully charged.   ➯ IP54 rating protects against limited amounts of dust and other particles and also protects from water sprays (but NOT submersible). • Great Sights and sounds from the GD-88 beautiful colorful screen and clear digital sound.   ➯ Large Display was bright and readable and I had no trouble seeing the display in bright daylight. The display squeezes in a lot of status icons but thankfully they are all mapped out and explained nicely in both manuals. Besides the operational items, the bright colorful display also shows the talker’s contact information. Using the CPS, 300K names can be loaded and stored in onboard memory, the GD-88 can reference by DMR number and Call Sign. Dual view shown.   ➯ Single VFO, Single Display option can be selected on radio keypad.    Menu -> Local Set -> Display Mode -> Single Mode [--o] switch on.    A/B switching is only available in Dual Display mode.   ➯ Good Sound from the large diameter 36mm built-in speaker that provides advanced voice processing technology to deliver clear sound even in noisy environments. • Advanced Features – Cross Band Repeat (aka CBR), Same Frequency Repeat (aka SFR) and GPS with APRS are three advanced features that add a lot of really useful features.   ➯ Cross Band Repeat (aka CBR), is a handy feature that lets the GD-88 act as a bridge between other radios. We travel quite a bit in the high mountains of Colorado where communication between two parties on different sides of a mountain doesn’t work well. Next summer I plan to setup a GD-88 for Cross Band and leave it with someone at the peak so we can test how practical it is to communicate over the mountain. It’s even better, because the GD-88 supports digital as well as analog, the GD-88 can Cross Band between radios using the same mode as well as between radios where the GD-88 uses its dual transceiver to both translate between digital and analog as well as transfer.   ➯ Same Frequency Repeat (aka SFR) is supported because the GD-88 is able to repeat on the same frequency. This is another feature supported by the GD-88 dual transceiver ability. The way it works is you set the GD-88 in Digital mode using both Time Slot 1 and Time Slot 2. Either TS1 or TS2 can be used. Twin Time Slots is inherent with DMR and necessary to use repeaters. This ability to split the signal allows the GD-88 to listen in one time slot and then retransmit the received signal on the other time slot. Even when both radios are using the same frequency.   ➯ GPS is built-in and useful to either show your location coordinates or for using the built-in APR feature. The GD-88 supports both digital APRS within and also supports analog APRS using 1200 bit AFSK. • Dual Display Controls will normally have the VFO A and VFO B positioned with VFO A or top and B underneath.   ➯ Changing CTRL band control position is accomplished by toggling the button with the right upper white dash key.   ➯ Changing PTT band assignment is controlled with the lower right red dash key just below the CRTL white dash key.   ➯ Zones List/Change is by pressing the lower left green hockey stick key to open the list of Zones and then use either the middle rocker switch or the middle channel knob to scroll the selections.   ➯ Menu key uses the upper left white dash key that is the used to enter the [Menu]. While inside a menu, the upper right white dash become the [Back] key. These default key definitions can be reprogrammed for other functions in the CPS. • Easy to Use Menu System is enhanced by a beautiful, bright display. The Menu system is icon driven and if it were only icons that could be confusing to a new user. Often it is un-avoidable because a different feature type may need a menu selection that drills down to a further menu. However, in my opinion, having the menu icons and descriptive title bars all help to get to the right area of the menu quickly. • Self-teaching Menu Mapping is how I think of this brilliant menu design that makes learning menu structure very, very easy. As you move across icons, note that the box title changes to indicate the items contents. Pretty quick you will learn the icon meanings. Another nice menu feature is the thoughtfully placed menu locations that make it even easier to get to the most common selections. Quick example is [Menu], [down], [Select] opens channel settings making it quick and easy to locate the setting you want to view or change. • Intuitive Keyboard Design makes changing VFO contacts, Power, APRS, Zones and Channels easy to be edited using the menu, radio keyboard or top side Selector knob. I think it took me only about a day or two until I found it easy, almost second nature, to just make my changes on the HT. Although each menu section may drill down to further menus, this is sometimes not avoidable due to the type of features available. However, in my opinion, having the menu icon helps to get to the right area of the menu quickly. • Codeplug Programming Software (CPS) - To be clear DMR programming is complicated but it does get easier after you’ve done one before or it can be easier to follow especially if perhaps the GD-88 is not your first DMR HT. If you are a newbie like I was, take heart, my opinion is that the GD-88 is the best DMR to start with. For one thing, Radioddity’s Extended Manual is unmatched for its excellent guidance and instruction. When it comes to picking a good Codeplug Programming Software, with the GD-88 you have your choice between two excellent and available for free sources:   ➯ DMR CPS_DRS (version 9.2.16 released October 2022) is the OEM CPS application and it is available as a free CPS download directly from the Radioddity website.   ➯ CPEditor by David MM7DBT (version 0.3.314.1 released March 2023) is the Codeplug Editor that is a User Community supported CPS application and it is available as a free CPS download directly from the author’s website based in Ireland (cpeditor.co.uk). As with all the current crop of Digital radios, DMR programming shares most common terms but it can be frustrating when from one brand radio to another, terms can live in a different place on the Menu structure and sometimes a term may take a slightly different form for the same DMR setting. Both available CPS applications are complete and either will provide a good foundation for programming the GD-88. Because the standards and common practices around implementing DMR are mature, you will find enough similarities between the two applications that switching between them is not difficult. Which one to choose? Based on my personal experience and what I’ve seen mentioned in comments by other GD-88 owners, it appears that the user supported application CPEditor is more popular and perhaps a little more polished. CPEditor has additional features that make programming the GD-88 more pleasurable. • GD-88 Radio Menu settings are all organized into logical tabs (Both) ‘DMR CPS_DRS’ and ‘CPEditor’ however, the edge goes to CPEditor whose screens are more concise and the groupings seem more logical. • In App Sorting for Contacts, Zones and Channels (CPEditor only) is community supported and author David MM7DBT has been quicker to implement users requested features like the ability to sort Contacts, Zones and Channels. I think I’m like a lot of users with a new radio. I spent time building my codeplug to include my collections of contacts, repeaters and talk groups. I travel, so I wanted to have groupings that represent items I will use in certain areas. So there I was adding a contact here or a talk group there basically grabbing a bunch on the fly. Then you get to that point where it’s all working like you want it but now you want to organize the lists in a different order, perhaps to control having favorites show first on the radio’s pick list. In DMR CPS_DRS you can’t insert lines or sort, basically, you have to delete the rows and then add them back in the order you want. CPEditor screens have built-in function to take a contact or talk group etc. and MOVE them up or down the list. Super! If I’m wanting to work with a big list like for instance my entire codeplug, CPEditor lets me export the entire codeplug to CSV format text file and I can then use a text editor or MS Excel to manipulate the list and IMPORT it back into the plug. DMR CPS_DRS also has IMPORT and EXPORT but not as many as CPEditor does. • CPS Application Terms, Options and Settings Extended Help – the two CPS applications diverge in their approach to providing extended help available while you are actually using the app.   ➯ DMR CPS_DRS (v9.2.16) provides in-app extended help by providing a dynamic changing text box for extended information. As an example, when you click on an input field, whether is a free text fields input field or a drop down selectable list, DMR CPS changes the visible text in the explanation box located at the lower section of the input window. On each screen of input collections (i.e. ‘Input Buttons’) Mouse clicking on a field will cause the explanation box on that screen to dynamically change and display additional information relevant to the field being changed or examined. The large text box at the bottom may go into detail explaining what the Defaults are and in some case what each setting is used for. If the box contains more info than is visible right away, just grab the box border and drag it to expand the box and see more. The quality of the descriptions is a mixed bag. A lot of them really don’t say much other than restating the term, however, especially on the more complicated fields, the explanations do a good job. This OEM version was written and designed to be translated to a broad mix of languages and as can be expected, occasional translations and characters don’t print well. Getting those fixed and adding new ones when firmware updates are pushed out, may take a while for the changes to appear in the app. But for the most part it is still a good CPS.   ➯ Codeplug Editor by David MM7DBT (v 0.3.314.1) provides a subject linked WiKi reachable thru links in the menu bar’s Help item. The Wiki is populated with detailed extended help and is the most current based upon its User Community support. Since the introduction of the GD-88 in late 2022, as part of their focus on providing best in class customer support, Radioddity has provided users with a responsive and frequent firmware update program. CPEditor administers and manages the CPEditor website as a forum for user input and discussion and has positioned itself as a central source for users of the GD-88 by providing:    - Download Source for the CPEditor application    - GD-88 Submission Site for Issues and Feature Requests    - User Maintained Wiki Library for CPEditor’s always current extended help • Easy CSV Export and Import helps with managing the programming requirements for DMR. As other DMR radios do, the GD-88 is pretty normal handling such things as RX Group lists and Zones. It is a little tricky having to program each channel within each Zone. Both CPS apps provide EXPORT and IMPORT functions for data management.   ➯ DMR CPS_DRS (v9.2.16) CSV Import/Export creates two types of CSV. The Contacts CSV contains all Contacts in the Contacts List. Channels are exported in a single zone file at a time. Within both Contacts and Zones/Channels the [Save] button is used to export a CSV.   ➯ CPEditor by David MM7DBT (v 0.3.314.1) CSV Import/Export provides CSV file Import/Export as a main menu function. All Import and Export functions use File Explorer to enable user to select desired CSV file and/or save location.    - Export Contacts CSV file includes All Contact records. CPE also adds an additional field for ‘RX Group’ listing every RX Group that a Contact is a member of.    - Export Channels CSV is a single file that includes All Channel records listed and sorted by Zone.    - Import from Existing Codeplug’ is useful for combining for updating codeplugs    - Import from Anytone CSV is able to crosswalk the Anytone values to their relevant GD-88 option or setting. • Automated DMR and Contact Database Download are supported in both CPS to provide a way to easily manage those large DMR databases. With the GD-88, instead of one channel section where you move pre-built channels into multiple zones, the GD-88 supports up to 300,000 ham contacts. World Wide DMR ID databases can be downloaded as a CSV file direct from the authority radioID.network website. It may be necessary to move some CSV columns in a supported editor before you can import the file. Some users find it simpler to keep their contact database smaller and just grow their own as they make QSO’s and contacts. Radioddity includes example import files or look in the extended manual for the CSV header format. Once imported, you can choose to have the call sign and their location shown, or just their call sign. • Dynamic Pictures and Drawings are provided to make it easier to learn and work with the GD-88. Take a look at the example to the right showing an easy to use design for setting programmable buttons using thorough drop down lists. When laying out the options for the GD-88’s programmable buttons, both use dynamically displayed photos of the actual GD-88 with visual indications as to which button a particular option belongs to. Note that when the relevant button is touched, the graphic below changes to show a picture of the buttons location on the actual radio. In the example, [PF3] is shown as the orange color button on top. • Digital Hotspot Support while not unique to the GD-88, the implementation does enhance the user experience. I use the free software ‘Blue DV’ with the cheapest tethered hotspot I could find (Simplex pi-less MMDVM, roughly $40). Following along in the Extended Manual ‘Hot Spot Guide’ I was able to get setup in about 30 minutes. For PC setup, Blue DV uses a virtual comport so run the free driver install for ‘CH340SER’ and after that when the hotspot is plugged into the PC’s USB port it will find the driver (see top corner of left graphic below). Next, install ‘Blue DV’ and use setup menu (Top Graphic) to enter 5 things (marked below with red-boxes). When active, your PC displays the lime green screen in the bottom graphic, slide the switch for ‘Serial’ and click PTT to start a session.   - DMR ID (obtained from RadioID.net)   - Call Sign (obtained when you get your FCC Amateur license)   - Frequency you want the hotspot to use (i.e. 446.250)   - BM Master (i.e. 3104)   - BM login (from the Brandmeister website) • Getting on Air with Your DMR Radio -- As a newbie to DMR, I reached out to Radioddity from time to time asking DMR questions. Michael on the support team suggested that I take a look at the DMR guide that Radioddity engineers put together just before the GD-88 was released. The guide is a 43-page free download titled “Getting on Air with Your DMR Radio v2.0” that starts with the very basics, such as how to apply for a DMR ID and continues with chapters on gathering information about DMR station(s) to the point where it guides you on how to create a working codeplug file that has all the settings for your DMR radio. The current release of the Radioddity DMR Guide includes sample codeplugs for several radios including lastly the GD-88’s mobile twin the DB-25D. Since the GD-88 shares much of the common operating system and code structures and terms you can just use the DB-25D examples when working with the GD-88. Grab the download when you pull down the Extended Manual. I found it useful and believer you will too. Here’s a short Table of Contents reproduced from the guide. Radioddity: Getting on Air with Your DMR Radio v2.0 - (Updated: 2022 Jan) 43 Pages   1. Intention of this document and what can you learn from it.   2. Make yourself familiar with DMR   3. Apply for and receive your DMR ID   4. Gather information about a DMR station or repeater   5. Install any USB-driver and CPS application required for your DMR-capable radio   6. General process of creating a DMR code plug from scratch   7. Sample codeplugs • Frequent Easy to Apply Firmware Updates are downloadable directly from the Radioddity website where you can download the Firmware Updater software, current and past firmware upgrades and detailed release notes. As of the March 2023 release, Radioddity has released three updates since the GD-88 2022 introduction. As they have for all firmware updates, Radioddity publishes the release notes listing feature and function upgrades as well as bug fixes. Reading the notes, it is obvious that they have carefully considered their customers’ requests for new features as well as worked to resolve issues that were brought to their attention. Using the Radioddity GD-88 dual band analog and DMR handheld radio is already a very nice experience that continues to get better as time goes on. • Radioddity Support – Today’s technologies change rapidly and in spite of careful engineering, un-foreseen technical problems can arise with any complex product. Typically, if I needed help, just send Radioddity support an email and wait. What I experienced was they got back to me in 24 hours and even when I wasn’t in a hurry, they still got back to me no later than a couple of days. What I look for is a company with excellent follow through and one that has the resources to act as quickly as may be required. For me Radioddity has met all my requirements with the GD-88. I find it difficult to be critical when dealing with a company like Radioddity and their superior support team. How nice it is to be able to get what I’m looking for easily and with good instructions and support. Herbert W. Smith Allen, Texas KI5VGT; WRPH738
Radioddity GD-88 New Firmware Release | 2023-03-30
As you know, Radioddity does care a lot for its customers. November 2022, we did release a new firmware for the Radioddity GD-88. Unfortunately, that firmware turned out to have issues with radios of a production batch that started shipping in December 2022. After we did identify the root cause we immediately did remove the firmware update from our websites and started to work on a fix for that issue. But the current COVID19-situation and the Chinese New Year period did not positively add to the overall progress. To make that long story short:   WE GOT IT DONE! Of course, we did fix the nasty ‘VFO-B Unprogrammed’ bug. We also fixed those intermittent issues with the correct display of Talker Alias data. Lots of you had been asking for a single VFO-display: Yes, now it is possible. Others had been asking for DTMF-support in analog-mode: Yes, implemented as well. Some had been complaining on the audio volume difference between analog and DMR-mode: Although not all of those differences in audio-volume are originating from the GD-88 we did align the general audio-output levels of analog- and DMR-mode. Another point that often did cause headaches for those new to DMR is the fact that an RX-group was required that also does contain the addressed contact assigned to the channel: Yes, ‘was required’ but no longer is required. Besides those, some more improvements on various other aspects have been implemented. You'll find the full details and some additional information within the corresponding release notes. Download your copy of the complete archive from Radioddity Download Page.   -- -- -- -- -- --   So, all in all we hope you will have as much fun using the Radioddity GD-88 with all those new and improved features as we do. You may now be asking why certain, well-known other features have not been implemented or bugs have not been fixed. Our initial goal was higher (yes, some GPS&APRS-bugs still need to be tackled), and a few other features requested by our users are also asking to be implemented. But in order for our customers to not wait any longer we decided to postpone those requests and bug-fixes for a future release. As you know, the Radioddity DB25-D and GD-88 are quite similar as they not only share the very same CPS. So, for those of you having the DB25-D: Your update will soon become available as well. Besides a proper display of DMR ID data and an improved Talker Alias display, we plan to provide DTMF for analog mode on the DB25-D as well. As soon as the DB25-D firmware update has been released, a new and once more improved version of our extended manual will be published as well. Stay tuned! vy 73, Radioddity Customer Support   -- -- -- -- -- --   Details you should know   1. White screen after firmware update It might happen, that your radio - after applying the firmware update - does show a white screen when turned on instead of the normal startup logo. Don´t worry, this is due to the fact that we do have slightly different hardware revisions out in the field that are covered by the very same firmware. In order to get rid of the white screen after updating, please proceed as follows: 1. turn off the radio 2. press the green button and keep it depressed 3. turn on the radio and wait about 2 seconds for the startup logo to be displayed This is a one time procedure. As soon as the startup logo is displayed as expected, you are done and it will not be required when again turning on the radio. Note: This procedure is only required for radios showing a white screen after the firmware update. Do not try out the procedure if your radio is not affected. 2. Single VFO After updating the radio, you will notice that the display only shows a single VFO.That´s one of the additional features you get for free with this firmware update. Even longer Talker Alias data will be displayed Using single display mode. To turn Single VFO on/off: MENU → Local Set → DisplayMode → Single Mode Note: Active Single Mode will disable switching between VFO-A and VFO-B. 3. DTMF for analog In analog mode the radio now allows to transmit so called DTMF-codes. Valid DTMF-codes are 0…9,*,# and A…D. Those DTMF-codes are generated by transmitting two different audio frequencies at the very same time. Those audio frequencies are defined by the column and the row of the DTMF code to be transmitted. Frequency 1209 Hz 1336 Hz 1477 Hz 941 Hz 697 Hz 1 2 3 A 770 Hz 4 5 6 B 852 Hz 7 8 9 C 941 Hz * 0 # D   As two audio tones are transmitted at the very same time this technique is called DualToneMultiFrequency (abbreviated as DTMF) encoding. For more details, please refer to the complete archive from Radioddity Download Page. -- -- -- -- -- --   We would like to thank all Radioddity GD-88 customers for their constructive feedback. If you do find any bug in the radio’s firmware, our CPS, or if you are missing a feature you would have expected, contact us to let us know. If you meet any issue through the firmware updating, contact us to let us know.
How to Update Radioddity GD-88 & DB25-D Firmware?
In general, an update of PC-software (CPS) or radio-firmware should only be done if it is really required, following the golden rule that "If it isn´t broken, don´t fix it!". Notes: ⅰ. Prior to performing a firmware update, save the current codeplug to a file. After doing so, the firmware update may be applied. Finally, the previously saved codeplug should then again be written to the radio using the corresponding CPS. ⅱ. This firmware update guidance works for both Radioddity GD-88 and Radioddity DB25-D   Before update, the following items are needed: ⅰ. Programming cable ⅱ. Radio ⅲ. A computer running the Windows (XP/Vista/7/8/10/11) operating system ⅳ. Download the firmware and update tool through Radioddity Download Page ⅴ. Make sure the radio is with sufficient power / stable power supply   Firmware Update Steps 1.Install the Firmware Update Tool To install the updater, just unzip the archive you downloaded from Radioddity support and double click on the file, named "IAP(setup).exe". This will install the firmware update program on your Windows machine and place a shortcut on your desktop. 2. Put the radio into firmwamre update mode ⅰ. Turn off the radio. ⅱ. Close the CPS (in case it had been running) in order to make sure the virtual COM-port of your programming cable is not occupied. ⅲ. Connect your Radioddity GD-88 or DB25-D via the supplied programming cable to your Windows PC. ⅳ. Press the [P1]-key on top of the Radioddity DB25-D and keep it depressed. For the Radioddity GD-88 it is the upper sidekey [P2] that needs to be kept depressed. ⅴ. Additionally turn on the radio either by turning the volume key clockwise (Radioddity GD-88) or by pressing the "power key" left to the [P1]-key (Radioddity DB25-D). ⅵ. The status-LED will constantly light up red. ⅶ. On the Radioddity GD-88 a special screen will be displayd with either "IAP_A" or "IAP_B" shown in the top line. On the Radioddity DB25-D, the display will stay blank and backlight will be on, regardless of your normal settings. ⅷ. Release the [P1]-key (Radioddity DB25-D) or the upper sidekey [P2] (Radioddity GD-88).   3. Start the update tool   4. Choose the virtual COM-port that does represent your programming cable 5. Click on "Open" Note: If the update tool connect to your Radioddity DB25-D or GD-88 successfully, it will output "IAP Successfully". If it isn´t able to connect to the radio, it will stay on CommPort:COM "x" (where "x" represents the selected virtual COM-port number of your programming cable ). If you forgot to shut down the CPS, you will get a "The COMM port is occupied or doesn't exit!" error.   6. Click on the button "Open APP file". 7. navigate to the path that does contain the update file that is intended to be transferred to the Radioddity DB25-D or Radioddity GD-88, such as: "C7000_DR880UV_HAM_A_2022-10-27" Note: ⅰ. Do not use update files intended for other radios, even if those radios may be looking like the Radioddity DB25-D or Radioddity GD-88. Using files not intended to be put on a Radioddity DB25-D or a Radioddity GD-88 may result in a loss of any guarantee ⅱ. Whereas a firmware update for the Radioddity DB25-D consists of just one file, the Radioddity GD-88 does require two separate files. One for each independent VFO (A and B). To select the target location of the file, long press the upper side key [P2] of the Radioddity GD-88 to switch between "IAP_A" and "IAP_B". The firmware files are normally marked with "HAM_A" and "HAM_B".   8. To start the actual update process, click on the ‘IAP’ button. Note: Do not press any key on the radio, do not remove power, just wait until the radio has finished the update process and turns off! During the update process, the status-LED will flash green and red and the application shows the progress by the increasing number of "Current Page". As soon as the update has finished on the Radioddity DB25-D, the radio will automatically shut down, whereas the Radioddity GD-88 will state the following on its screen "Status: Rec Done!". If you have just updated one of the two GD-88 VFOs it is now time to select the second VFO (long press of the upper side key) and update it with its corresponding firmware file as well. After you have updated both VFOs of the Radioddity GD-88, turn off the radio.   9. You may now normally power on the radio again. To check which firmware version currently is installed, click: MENU → Device Info → Version he output will look similar to:   Enjoy the new firmware!
Radioddity GD-88 Now Supported by CPEditor!
Radioddity GD-88 now also fully supported by CPEditor As you may know, David MM7DBT´s CPEditor already does support our well-selling Radioddity DB25-D mobile radio for quite a long time. We are happy to tell you that now David additionally added the functionality required to fully support the Radioddity GD-88 handheld radio as well! In order to make the transition even easier, his CPEditor even allows to write a DB25-D codeplug formerly created with his CPEditor to a GD-88 or a GD-88 codeplug to a DB25-D. His CPEditor has been successfully tested with the initial firmware as well as with the newest release and we are confident, that future firmware releases of the DB25-D and GD-88 will also be fully supported by his CPEditor. Besides general functionality to write a codeplug to the radio and read it from the radio and store it in a file, his CPEditor is also capable of updating the radio firmware, changing the startup-logo and writing the DMR-database (even selectable per country) to the radio. Just one single tool does it all. Now searching for an updated DMR-ID database, personalization of your radio, keeping it fresh... and some more functionality is included within just one single tool that even runs under Windows 11 and supports all COM-ports. However, two things Radioddity customers should know: 1. Radioddity does not give any support to his editor. If you have any suggestions or need help/support about it, please use David MM7DBT's wiki and forum to communicate with the community. 2. If you do use David MM7DBT´s CPEditor and feel happy, please consider honoring his work by using the donating link as found on his Codeplug Editor website. Download here the Radioddity version of his CPEditor today!   Little Secret: The next update of his editor will also support new features that will be part of the next Radioddity GD-88 firmware update. Stay tuned...
Getting on Air with Your DMR Radio v2.2 (Updated: 2023 May)
Our engineers have been busy and did a complete review on the old version of our 'Getting 'on air' with your new DMR radio' document. The former version was already quite old and needed an urgent review. Now the archive includes not only the 40 page document that´s supposed to get you started with DMR without taking all those hurdles that normally show up. The archive also includes sample codeplugs for Radioddity GD-73, GD-77, GD-88, DB25-D, RD-5R and GD-AT10G. Besides those, it also comes with sample codeplugs for Baofeng DM-1701 and TYT MD-9600. And in order to support you on getting the required parameters in order it also includes a bunch of spreadsheets. What can you learn from this document? 1. Disclaimer 2. Make yourself familiar with DMR 3. Apply for and receive your DMR ID 4. Gather information about a DMR station 5. Install any USB-driver that might be required 6. Install CPS according to your DMR-capable radio 7. General process of creating a DMR code plug from scratch 8. Sample codeplugs Get you copy of the archive > CLICK HERE <
Beginners Quick Guide | The Basics of DMR Digital Mobile Radio (Updated: 2024)
--- by Jason Reilly Introduction: "The nice thing about standards is there are so many to choose from." I love the ironic humor in this statement; a standard should result in everyone doing things the same way in order to be compatible, and prevent having to constantly re-invent the wheel. Yet, everyone has to have their own standard! Just take two-way radio digital voice systems for example: there’s P25 phase 1 and phase 2, NDXN, DMR, TETRA, OpenSky, Provoice, and dPMR, along with a whole host of legacy digital voice modes as well. That doesn’t even consider the ham radio contenders, such as DStar, Fusion, FreeDV, some old offerings from Alinco & AOR and so on. And guess what? Absolutely none of them are compatible! Choosing what digital voice standard you'll go with can be daunting. For emergency services and government communications, P25 is by far the most dominant, there’s no doubt about that. For business & private radio, DMR followed by NXDN is the two most popular choice. In the ham radio arena, the picture is a little less clear. DStar took an early lead, but Yaesu is keen to take market share with their Fusion offering. Hams have always been keen to leverage off existing commercial equipment, and it seems the most popular commercial system adopted presently is DMR. Personally, I think DMR will take the lead in both the commercial business & private two-way radio field as well as in ham radio. This is helped in no small part by the ready availability of DMR radio equipment at prices that rival traditional analog two-way radio, and that one of the biggest names in two-way radio, Motorola, are throwing their weight behind DMR.   Motorola's SL7750 blurs the line between DMR radio and cellular mobile phone   Three flavours: There are three "tiers" or levels of functionality for DMR systems. Tier 1: The simplest form of DMR is Tier 1, which is mainly used for simplex communications, with no repeaters. The human voice is digitally sampled and compressed with the AMBE+2 codec, and then transmitted in this digital form to another radio. Tier 2: Things start to get a bit more complicated here. With Tier 2 DMR, repeaters are used in a TDMA arrangement, with two "timeslots. What this means is that two completely separate radio transmissions can be going through the repeater at the same time; each radio takes turns in transmitting in short 27.5 millisecond bursts. In addition to this, radios can be set to logical closed groups called ’talk groups’, which you can think of as ’virtual channels’. Repeaters can be linked via the internet to form networks that can be as small as just two repeaters, or thousands of repeaters across the world. Again, the AMBE+2 codec is used to turn speech into compressed data for transmission. All amateur radio DMR systems are Tier 2, as are many business / commercial radio DMR systems. Tier 3: This is effectively a trunked radio system on top of Tier 2. A pool of frequencies are used to carry the TDMA transmissions. This is used by more complex or larger networks for big businesses and commercial radio users.   The advantages of DMR: So why go to all this trouble, when plain old analogue FM works perfectly well? DMR has the advantage that it four times more efficient when it comes to spectrum usage. For one 25 kHz analogue FM channel, you could fit four DMR transmissions. Not only that, but DMR offers some very flexible calling facilities - you can call one person, a group of people, or everyone in your fleet at once. While not every DMR network supports it, sending of data and short messages is also possible. DMR is also designed to be easy to network, with connections using IP, so creating wide coverage areas using a network of DMR repeaters is already built-in; cover your city or cover the entire country! Yet another advantage is because a DMR transmitter is only turned on about half the time due to it transmitting in bursts, battery life is longer.   TYT's hugely popular MD-380 can be bought for around $100   Some DMR Jargon: Colour codes: Every DMR transmission uses a "colour code" which is very similar to CTCSS or PL tones in the analogue radio world. On a repeater or simplex frequency, every radio must use the same colour code to be able to communicate together. The main use for colour codes is for where two repeater coverage areas on the same frequency may overlap, different colour codes are used to ensure each radio accesses the correct repeater. Timeslot: For Tier 2 and 3 systems, a timeslot is a slice of time, about 30ms long, that a radio can transmit in, or receive in. There are two timeslots per frequency, and you need to have your radio configured for the right colour code for the repeater, the correct timeslot and correct talkgroup for you to be able to hear anything. Zones: This is simply a collection of channels & talkgroups, all grouped together in one "zone" or bank. A radio user can switch zones to access a different lot of channels & talkgroups that they may wish to use. Typically a zones are divided into repeaters for different areas, so you might have one zone for the west side of a city, and another covering the east side of the city - but there's nothing to say that you must set up a zone that way. Code Plug: This is a Motorola term that has stuck over the years, and in the DMR context means a complete configuration file of channels, talkgroups, zones, contacts etc. for a radio. The code plug can be saved to computer disc, and is used to program a radio to give it the functionality a user requires. CPS: Another Motorola term, meaning Customer Program Software. Simply put, this is the software you’d use to create a "code plug" and configure your radio. Hotspot: A small box that connects to the internet and acts like your own personal low power DMR repeater, useful if you're not in range of a DMR repeater to access. You can even take them with you and use your cell / mobile phone wireless data to connect the hotspot to the internet and be able to use DMR anywhere you get cellular signal. Most hotspots are multi-mode, handling not only DMR but DStar, Yaesu Fusion and P25 as well. ZUMspot, Jumbospot, Openspot, MMDVM etc are all examples of hotspots that you can buy or build yourself.   Radioddity GD-77, dual band, DMR & FM, I think the best bang-for-your-buck DMR portable, also around $100   So what's in it for me? The use of DMR in radio hobbyist circles falls into two categories: ham / amateur radio and scanning receiver use. Lets take a quick look at each: Ham radio: Hams have long taken advantage of surplus, second hand, or even new commercial radio equipment and re-purposed it for their own use, and DMR equipment is no exception. Worldwide, DMR enabled and connected repeaters are appearing and are interconnected to provide a huge linked network spanning the entire globe. Depending on the talk group selected, you could be communicating just around town, across your region, across the entire country, and some groups even cover the world. Motorola DMR equipment is frequently used, but increasingly the cheaper units, in particular TYT, have increased the affordability and availability of DMR equipment to the mass market. In some cases, you can get on air to the DMR scene for less than a hundred dollars! Scanning: As the world relentlessly marches on to a digital future, many businesses and commercial interests have migrated their legacy analogue FM two way radio systems to DMR. There are scanners available that can hear DMR, enabling the scanning hobbyist to continue to listen to such transmissions. For those hobbyists who can’t justify the high price tag of those scanners to listen in to DMR, there are other alternatives: certain computer software can decode DMR with a regular scanner and a ’discriminator tap’, or a ’virtual audio cable’ if using an SDR, or if portable DMR reception is desired, an entry level DMR transceiver from TYT or Radioddity will do the job very well - to keep yourself on the correct side of the law, you should disable any transmit capabilities of these transceivers.

Radioddity

GD-88

Dual Band, Dual Mode, Dual Standby

The GD-88 contains two independent VFOs that allow dual-band operation on VHF and UHF channels. With dual mode, the GD-88 allows a smooth transition from communication with conventional analog radios to digital DMR (Tier II) at any time. It also comes with dual-standby to monitor two channels at the same time.

7W + 300K

DMR Contacts

The Radioddity GD-88 is a powerful handheld radio with a compact design, featuring selectable output power of 7W/2.5W and storage for up to 300,000 DMR contacts, which can be bulk imported via software.

0102/02

Cross-band Repeater Function

Working as a base radio to extend your talking range, the GD-88 is capable of transmitting on one frequency band (UHF/VHF) a receive a signal on the other frequency band (VHF/UHF). Compared to traditional cross-band repeaters, the GD-88 can cross-band repeat from an analog band to a digital one (or from digital to analog.)

Same Frequency Repeater (SFR)

Using just one frequency for transmitting and receiving gives it full use of the DMR TDMA-technique by using one timeslot for receiving and transmitting the received signal on the same frequency, but using the second timeslot, acting as a Same-Frequency-Repeater (SFR). Multiple GD-88’s within a certain area can create a mesh-network, allowing single-VFO radios to communicate with other radios bridged by several GD-88’s that are operating in SFR-mode. The GD-88 is must-have radio for emergency situations where conventional communication systems are limited or unavailable.

01

Cross-band Repeater Function

Working as a base radio to extend your talking range, the GD-88 is capable of transmitting on one frequency band (UHF/VHF) a receive a signal on the other frequency band (VHF/UHF). Compared to traditional cross-band repeaters, the GD-88 can cross-band repeat from an analog band to a digital one (or from digital to analog.)

02

Same Frequency Repeater (SFR)

Using just one frequency for transmitting and receiving gives it full use of the DMR TDMA-technique by using one timeslot for receiving and transmitting the received signal on the same frequency, but using the second timeslot, acting as a Same-Frequency-Repeater (SFR). Multiple GD-88’s within a certain area can create a mesh-network, allowing single-VFO radios to communicate with other radios bridged by several GD-88’s that are operating in SFR-mode. The GD-88 is must-have radio for emergency situations where conventional communication systems are limited or unavailable.

GPS with APRS Function

GPS with APRS Function

The GD-88 has a powerful built-in GPS receiver for use with APRS to allow real-time push messages of position beacons to the APRS-network. This makes it ideal for outdoor activities where you need to be tracked by others, especially emergency situations.

GPS Function

Analog and Digital APRS

Receive and Transmit

3000mAh Battery & Power Saving

With its powerful 3000mAh battery and the built-in power saving feature, the Radioddity GD-88 supports up to 24 hours of standby time, 15 hours of continuous working time under the analog mode, and 23 hours under digital mode.

2-in-1 Desktop Charger

The GD-88 comes with a unique desktop charger, allowing you to charge your radio and an extra battery (not included) at the same time.

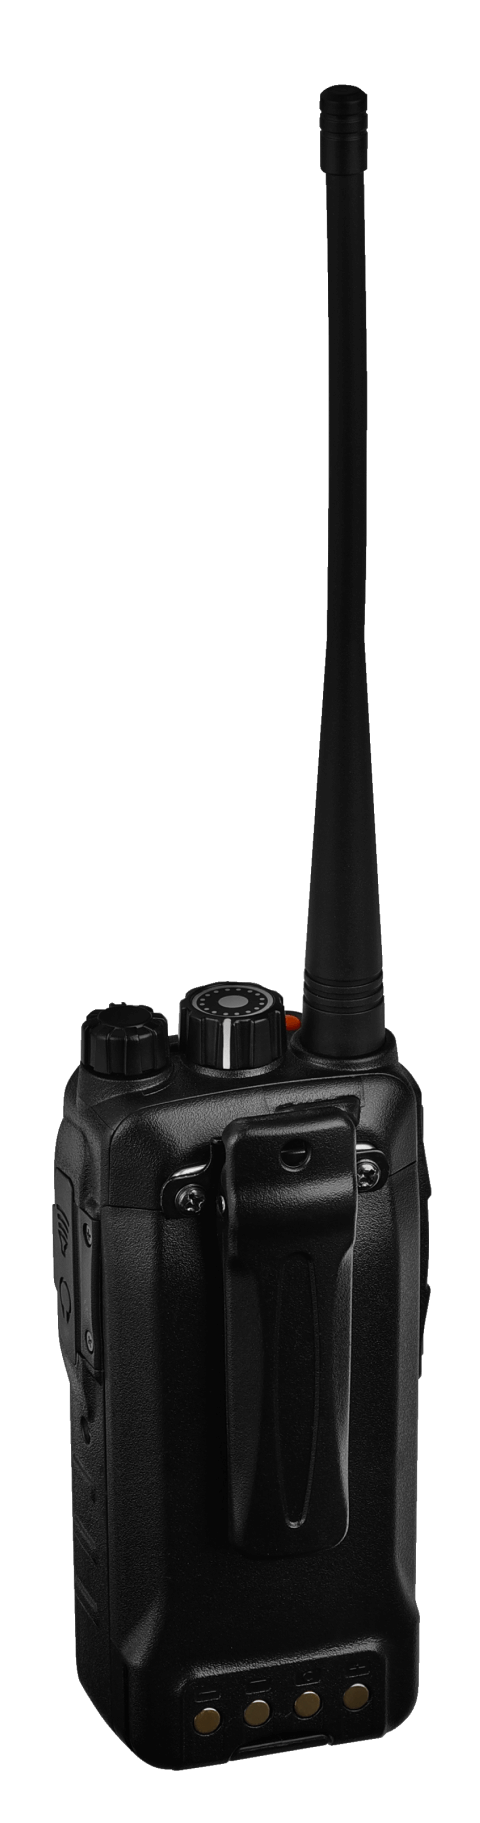
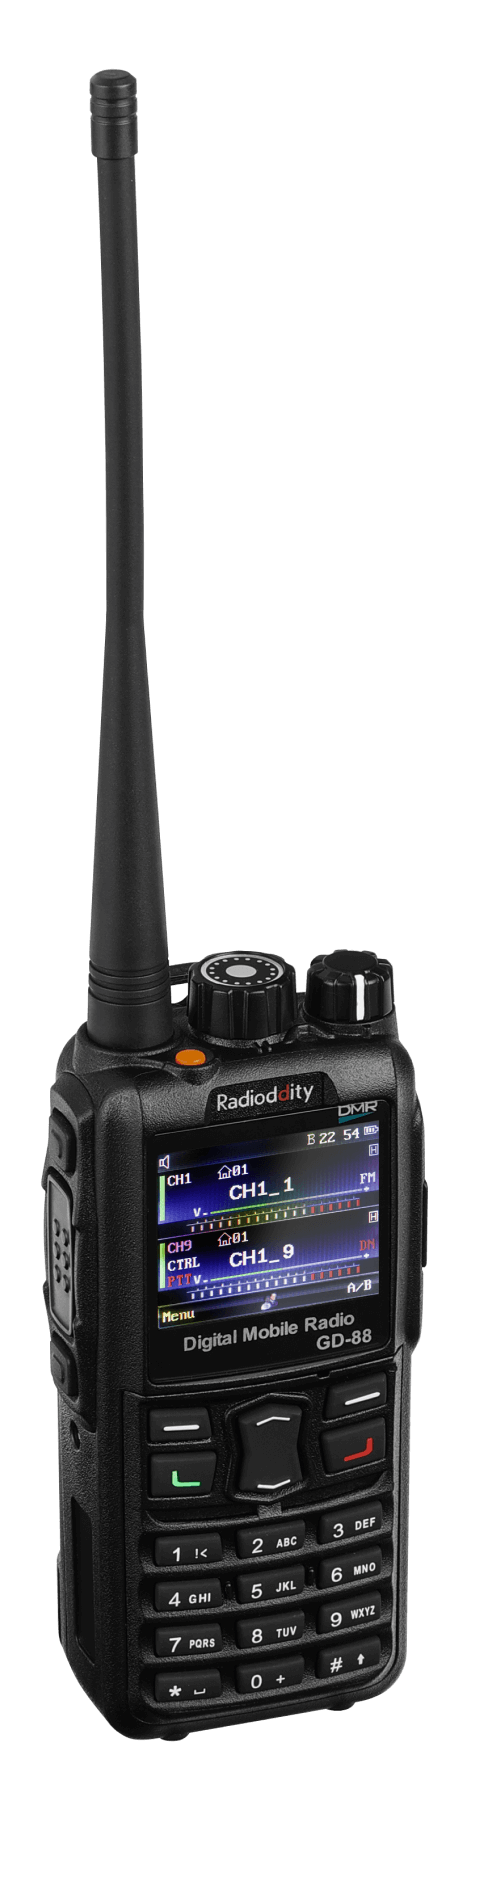
Four Customizable Keys

The 2 side buttons above and below the PTT-key, the orange emergency button at the top, and the green key above the numerical keypad are customizable each with long/short press options. You can set different functions according to your needs such as High/Low Power, Backlight On/Off, Keylock On/Off, VOX On/Off, Select Zone, Scan On/Off, Scan Mode, Repeater/Talk Around, and many more functions.

Crystal Clear Sound

A Built-in 36mm diameter large speaker utilizes advanced voice processing technology to ensure a crystal-clear sound even in a noisy environment.

IP54 Waterproof

The GD-88 will be protected against contamination from limited amounts of dust and other particles. Additionally, you can be confident that it will be protected from water sprays from all directions.

Detailed parameters

General

General 

VHF UHF

Operating Temperature

0° C ~ +40° C

Frequency 

136-174 MHz   400-480 MHz

Antenna Impedance 

50 Ω

Type 

Dual band, Dual standby, Dual mode, Dual VFO

LiPo Battery 

7.4V / 3000 mAh

Digital mode 

TDMA 2-Time Slot technology
(Tier 1 and Tier 2)

Rated Voltage 

DC 7.4V

Digital vocoder 

AMBE+2™

Dimension (H x W x D) 

125 mm x 60 mm x 39 mm

Digital agreement 

ETSI-TS 102 361-1, -2, -3

Weight 

317 g

Zones 

16

Battery

The average battery life under 5/5/90 duty cycle, and using carrier squelch
and TX high power with 3000mAh LiPo battery
Analog: 15 hours / Digital: 23 hours


Channel Capacity 

Up to 4000 (250 Channels per Zone )

PLL Channel Spacing 

12.5 kHz / 25 kHz 

Receiver

Receiver

VHF UHF

Adjacent Channel Selectivity 

≥60 dB @ 12.5 kHz / ≥65 dB @ 25 kHz

Frequency Range 

136-174 MHz   400-480 MHz

Spurious rejection 

65 dB

Operating Bandwidth 

≤±5 kHz @ 12.5 kHz / ≤±7 kHz @ 25 kHz

Rated audio 

500 mW

Frequency stability (-20 °C ~ +25 °C) 

± 1.5 ppm

Audio Distortion @ rated audio 

3%

IFs  

mixing 45 MHz in VFO A
mixing 51.550 MHz in VFO B

FM hum & noise 

-40 dB @ 12.5 kHz / -45 dB @ 25 kHz

FM modulation Type 

12.5 kHz: 11KOF3E / 25 kHz: 16KOF3E

Audio response 

+1 dB, -3 dB

Analogue sensitivity 

0.3 µV / 0.25 µV

Conducted / radiated emission 

-57 dBm

Digital sensitivity (5 % BER)  

0.25 µV / 0.2 µV 

Intermodulation 

65 dB

Transmitter

Transmitter

VHF UHF

Adjacent Channel Selectivity 

-60 dB @ 12.5 kHz / -65 dB @ 25 kHz

Frequency Range 

136-174 MHz   400-480 MHz

Maximum Deviation 

≤±2.5 kHz @ 12.5 kHz
≤±5.0 kHz @ 25 kHz

Frequency stability (-30°C, +25°C) 

± 1.5 ppm

Spurious Emission 

≤65 dB below carrier

Low Power 

2.5 W 2.5 W

Audio Response 

+1 dB, -3 dB

High Power 

7.0 W 7.0 W 

Audio Distortion 

3%

FM modulation Type 

12.5 kHz: 11KOF3E / 25 kHz: 16KOF3E

4FSK digital modulation


12.5 kHz data: 7K60F1D and 7K60FXD

Modulation restriction 

±2.5 dB @ 12.5 kHz / ± 5 dB @ 25 kHz12.5 kHz data: 7K60F1D and 7K60FXD

FM hum & noise

-40 dB @ 12.5 kHz / -45 dB @ 25 kHz12.5 kHz data and audio:7K60F1W

Conducted / radiated emission 

-36 dBm < 1GHz / -30 dBm > 1 GHz 

Specifications

Frequency Range

VHF 136-174MHz RX/TX

UHF 400-480MHz RX/TX

FCC ID2AN62-GD88
Low Power2.5W
High Power7W
Zones16
Channel Capacityup to 4000 (250 perzone)
Rated VoltageDC 7.4V
Digital Contacts300,000
Water-resistant RatingIP54
Working ModeAnalog & Digital
Display2” color TFT Screen
Battery

3000mAh lithium-ion 

battery with power 

saving


Bandwidth

VHF ≤±5 kHz @ 12.5 kHz 

UHF ≤±7 kHz @ 25 kHz

DMRTier I & Tier II
Antenna SocketSMA-F
Fits SMA-M Antenna
Speaker Socket

2-pin Kenwood/

Wouxun earpiece/

speaker mic K1 

connection

Size

5x2x1.4in | 

12.5x5.5x3.5cm

Weight0.7 lb | 330g

What’s in the box?

  • 1 x Radioddity GD-88 Radio
  • 1 x 3000mAh Battery
  • 1 x Antenna
  • 1 x Belt Clip
  • 1 x Desktop Charger (2-in-1)
  • 1 x AC Adaptor
  • 1 x Wrist Strap
  • 1 x Programming Cable 
  • 1 x User Manual


USD