CLICK HERE to download Latest Firmware V1.3
Note: You need to upgrade your G90 to a minimum FW 1.74 in order to work with GSOC properly.
CLICK HERE to download GSOC lastes Quick Operation Guide / User Manual
CLICK HERE to learn how to use the Bluetooth to conenct GSOC to PC.
CLICK HERE to leave you using feedback & suggestion.
CLICK HERE to join the GSOC open source project.
2021/03/01 Open Source Group:
CLICH HERE to join github group and discuss
2021/01/18 Firmware V1.3 Release:
CLICK HERE to download
1. Add Bluetooth serial port
2. Add Full Reset Button in system menu
3. Reduce CW side tone latency (with G90 MainUnit FW V1.77)
2020/11/26 Firmware V1.1 Release:
CLICK HERE to download
1. Solved the CW sidetone delay problem
2. Solved the problem of unstable system and occasional crash
3. Added RTTY modem
4. Added CW decoder
5. Added SWR scanner
6. Added FFT/Waterfall level adjustment
7. Added FFT line/fill color mixer
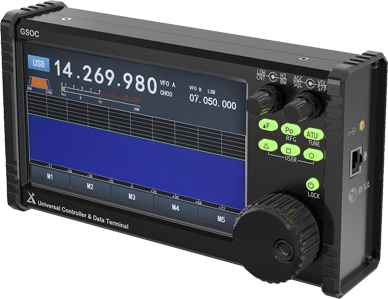
The Xiegu GSOC is a universal controller product used for external control of Xiegu G90 radio. The GSOC is designed with expandability in mind. With firmware upgrades, its functions can be expanded to many additional capabilities.
GSOC consists of a baseband processing unit and an SDR receiving unit which is capable of receiving and processing IF signals and IQ signals and displaying content such as frequency spectrum, waterfall plot and demodulation information. The GSOC uses 24bit ADC sampling and processing.
Dimensions are W 8 ¾ H 4 ¾ D 1 ¾
The GSOC has a beautiful 7-inch Color Touch LCD screen. The GSOC has been designed with extra processing power and memory so it can expand into controlling future Xiegu radios and gain new desirable features as well.
Features
• 200k bandwidth spectrum display and waterfall display
• 1024*600 7-inch color touch LCD screen
• Digital mode decoding capabilities
• Supports mouse & keyboard operating
• Dual-core eMMc application processor
• Built-in PSK, RTTY, CW digital mode
• RX & TX Multi-band Equalizers
• Easy two-wire connection to G90
• Fast frequency change & band selection
• Three user-programmable buttons
• Power design for future expansion
Specifications
Applicable model: G90
Operating temperature scope: 0°C ~ +50°C
Frequency stability: ±1.5ppm in the 10~60min after startup
@25°C: 1ppm/hour
Supply voltage: 10.5~16.5VDC, negative electrode grounding
Current consumption: 600mA @ Max
Display screen resolution: 1024*600
Touch screen type: Capacitive
Spectral sensitivity: -120dBm ± 3dB
Audio output: 0.5W (8Ω, ≤10%THD)
Earphone output impedance: 16~32Ω
Size: 230*130*45mm (excluding projection)
Weight: about 1.2kg / 2.65lb (only host)
FAQ:
Q: Does it support wireless mouse? Do I need to install any operating system to use mouse and keyboard?
A: Xiegu GSOC supports any mouse including wire and wireless. Plug and play, you don't need to install anything.
Q: Does the GSOC have a built in sound card?
A: GSOC has 2 built-in sound cards.One is 24bit/192k, the other is 8-32bit/48k, both availavle for IQ demodulation and digital communication.
The GSOC is equipped with a high clock rate dual-core processor, large memory and built-in eMMc storage. This design combination offers strong and smooth operation.
As always, Xiegu offers unbeatable value for the money in advanced Amateur Radio equipment. We will make continuous free firmware updates which give you even more enjoyment of this wonderful product and hobby!
Comparison
|
|
|
|
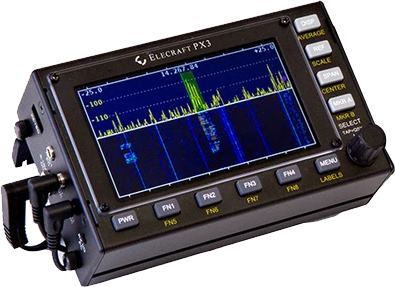
| Features | GSOC | PX3 |
| Screen Resolution | 1024*600 | 800*600 |
| Screen Type | Touch | Normal |
| Spectrum | 192K | 192K |
| Display Spectrum + Waterfall Together | ✔ | ✘ |
| Large Tuning Knob | ✔ | ✘ |
| Dual Controll Tuning Knob | ✔ | ✘ |
| Function Customized Knob & Keys | ✔ | ✘ |
| Processor | eMMc application processor | single chip memory |
Related Items & Accessories
Xiegu G90 Radio
Xiegu G90-H1 Holder
Radioddity G90-H2 Stand
Xiegu CE-19 Expansion Port for easy PC connection
Xiegu X5105 Transceiver
Xiegu XPA125B Amplifier
Radioddity PAX100 100W Amplifier
What's in the box?
1 x Xiegu GSOC controller
1 x Power Cable
1 x I/Q Cable for G90
1 x G90 Connection Cable
1 Year and 6 months Manufacturer's Warranty.
• This warranty from Radioddity covers all new items (except Xiegu brand)
purchased from radioddity.com. For purchases made
through other platforms like Amazon, eBay, and Walmart, we offer a 1-year
warranty period from the date of purchase. The specific warranty terms may vary
depending on the authorized dealer.
• This warranty cannot be transferred. You need to provide proof of purchase
from us or an authorized dealer to avail warranty service.
• For Xiegu brand items, we offer a 1.5-year warranty for the G90, X6100, and
X5105 models starting from September 14, 2022. All other models come with a
1-year warranty.
What Does This Limited Warranty Cover?
We warrant that the Products are free from defects in materials and workmanship
under normal use and use in accordance with the respective Product user manual,
during the Warranty Period. Please refer to the Instructions inside each package
for a description of proper use and care of the unit.
What Does This Limited Warranty Not Cover?
This limited warranty does not cover damages directly or indirectly arising or
resulting from or during:
(1) accident, misuse, abuse, vandalism or acts of God (including lightning and
other weather conditions)
(2) use with another product or other damage or loss suffered by the use or
combination of any other item
(3) improper or inadequate maintenance
(4) repairs by an unauthorized service technician
Open Box items are products that have damaged packaging or are otherwise not
suitable to be sold as new. All items are tested to be working by a member of
our team.
Open Box items come with a 6-month warranty instead of the standard 18 months
warranty and are not eligible for any warranty extension offered to new
products. We will not accept returns of Open Box items due to cosmetic damage or
other non-performance-related issues. All sales of Open Box items are final and
not eligible for a return or refund.
If for some reason the item is defective on arrival, please contact
If you are satisfied with our products and service, please kindly leave us a
positive product review. Any problem, be free to contact us
support@radioddity.com
We strive to answer all emails as quickly as possible, but due to high email
volume, it may take time for us to reply. Thanks in advance for your patience!
Order Processing
All orders are processed within 1-2 business days after we receive
your full payment, excluding weekends and holidays.
As soon as your order is ready, we’ll update the tracking number and send it to
you if you’re a Radioddity Member. We highly recommend that you register as a
Radioddity Member
here.
If the item you ordered is temporarily out of stock, our customer service team
will reach out to you. You can choose to wait until the item is back in stock or
cancel your order.
Please be aware that we have several distribution centers globally. Therefore,
your orders may be shipped from various locations including the United States,
Canada, Europe, or China, depending on the availability of the product in our
inventory.
Flat Shipping Rates
|
Country |
US |
EU |
Outside US & EU |
| Free when order amount ≥ $99.99 | Free when order amount ≥ $99.99 | Free when order amount ≥ $99.99 | |
|
Flat fee |
$9.99 |
$9.99 |
$9.99 |
|
Ship from |
➤ United States |
➤ Germany ➤ China |
➤ China |
| Handling time | 1-2 business days | 1-2 business days | 1-2 business days |
|
Delivery time |
5-7 business days |
5-7 business days |
7-15 business days |
Note:
1. Customs fee included for US & EU countries.
2. Please note that taxes will be applied to shipping rates. These taxes will be calculated and added to your total at checkout.
3. US Shipping does not include Alaska, Hawaii and Puerto Rico area. Please contact us for a detailed shipping fee to these areas.
4. For EU countries, please be aware that the listed product prices do not include VAT.
5. For shipping options to other countries, please visit our EXPANDED INTERNATIONAL SHIPPING page.
6. Please be aware that for outlet items, pre-orders, and open box items, the
shipping services and charges may vary.
How Do I Change The Shipping Address Or Cancel My Order
Contact support@radioddity.com (CLICK HERE) immediately if you need to change the shipping address or cancel your order. Please be advised that some orders are shipped very soon after placement and it will not always be possible to make changes to the shipping address and/or cancel the order.
Frequently Asked Questions
- 1. What forms of payment do you accept?
- 2. Why has my credit card payment failed?
- 3. How do I know if it is safe to shop with you?
- 4. Is there any discount for bulk/volume purchases?
- 5. Do you ship internationally?
- 6. How can I contact Radioddity.com for additional assistance?
- 7. How are warranties handled?
- 8. Why didn't I receive an order confirmation email after my PayPal payment is completed?
- 9. How do I change the shipping address or cancel my order?
- 10. What does Radioddity.com charge for shipping order and how long will it be before I receive my order?
- 11. Do you ship to PO boxes or Military APO/FPO addresses?
- 12. Why am I unable to track my order?
- 13. Taxes, Customs, & Duties
- 14. How do I return products if I am unsatisfied?
- 15. What do I do if I received the wrong item?
- 16. How do I return defective items?
- 17. When will a replacement be sent?
- 18. How long does it take for me to get a refund?
1. What forms of payment do you accept?
Radioddity.com currently accepts PayPal* or credit card for all orders.
*When purchasing with PayPal, your shipping address will automatically default to the address on file with PayPal, regardless of the shipping address you enter on your Radioddity.com order.
2. Why has my credit card payment failed?
Payment with a credit card may fail because of bank authorization and fraud prevention systems. If you are having trouble making a payment via Credit Card, you may contact your card issuing bank or PayPal directly. Here are PayPal's phone numbers:
+1-888-221-1161 (US & Canada Toll Free) +1-888-215-5506 (US & Canada Toll Free)
+1-402-935-7733 (International) +1-402-935-2050 (International)
3. How do I know if it is safe to shop with you?
Radioddity.com takes great pride in offering a safe and secure online shopping experience. We also respect your privacy and we're committed to protecting it.
4. Is there any discount for bulk/volume purchases?
Radioddity does provide discounts for some bulk/volume purchases. Please email our customer service for more details.
5. Do you ship internationally?
Yes, we do! We ship to US & EU countries. For some products, we ship to CA.
6. How can I contact Radioddity.com for additional assistance?
Email Customer service:
please email us via support@radioddity.com, and we will respond to your email as quickly as possible, usually within 24-48 hours.
7. How are warranties handled?
Repairs on defective merchandise are handled by the manufacturers and not by Radioddity unless otherwise indicated. If any item arrives damaged due to shipping, immediately contact the courier. Keep all shipping materials and contact us immediately.
8. Why didn't I receive an order confirmation email after my PayPal payment is completed?
We send a confirmation email to your primary PayPal email address or the e-mail address you have specified if you used the "PayPal Express Checkout" method. Make sure that you have a Radioddity account registered under your PayPal account's primary e-mail address.
In rare circumstances, a technical bug confirmed by PayPal can get in the way. If you do not receive any information at all, and your order does not appear in your Radioddity account, please contact us and send us your order details.
9. How do I change the shipping address or cancel my order?
Please contact customer service immediately if you need to change the shipping address or cancel your order. Please be advised that some orders are shipped very soon after payment and it will not always be possible to make changes to the shipping address and/or cancel the order.
10. What does Radioddity.com charge for shipping order and how long will it be before I receive my order?
Please CLICK HERE to
learn about our shipping policy.
11. Do you ship to PO boxes or Military APO/FPO addresses?
Only USPS can ship to both PO Boxes and Military APO/FPO addresses. The items have to be less than 2kg. Please allow additional time for orders to be shipped to these addresses. Express shipping cannot be sent to both PO Boxes and Military APO/FPO addresses.
12. Why am I unable to track my order?
It can sometimes take 24-48 hours or so for tracking information to update once an order has shipped from our warehouse.
Occasionally, a package may not receive the proper origin and transit scans while on its journey to you, so neither us nor express is able to track the exact location of the package in transit.
Please email us if you do not receive your order by the end of the quoted time frame. Please note that orders shipping via UPS can be delivered as late as 9:00 pm local time in some areas.
13. Taxes, Customs, & Duties
If the package is checked by your country's customs office when the item arrives in your country, most websites are declaring that you are responsible for import duties, tariffs, and taxes. However, Radioddity will be happy to go fifty-fifty with customers. Quality customer service is our highest value and we try our best to reduce our customer’s loss.
14. How do I return products if I am unsatisfied?
Please CLICK HERE to
learn about our return policy.
15. What do I do if received the wrong item?
Return the wrong item. If the item you received is completely different from the one you ordered, please contact our Customer Service with photos or videos of the different product. If a return is necessary, replacement plus return shipping cost will be issued to you on receiving the returned product. Or if you decide to keep it, we will offer a 10% discount for buying it.
16. How do I return defective items?
If your product turns out to be a defective one with physical damage within 30 days from the initial receiving date. You can mail the item back in the original package without any wear and tear for a free replacement. However, you will need to provide photos and videos showing the defect(s) of the product.
*NOTE: We strongly recommend obtaining and saving your return tracking number until you are notified that we have completed your refund.*
17. When will a replacement be sent?
Replacements are treated the same way as that of new orders -- they typically arrive in 10 to 13 days. If a product needs to be returned for replacement, the replacement is sent after receiving the returned item.
18. How long does it take for me to get a refund?
It may take 1 or 2 weeks for your return to reach our warehouse. Once it is received and inspected (usually within 72 hours of arrival) your refund will be processed and automatically applied to your credit card or original method of payment within 2 days. Please note that depending on your credit card company, it may take additional 2-10 business days after your credit is applied for it to post to your account.


