Your Cart

Xiegu X6100 HF Transceiver | Full Mode | SDR Radio

Write a review
SKU: 715-XH-X6100
  • $579.00
  • Regular price $639.00 SAVE $60.00


Only 440 left in stock

Current Stock Status
United States
Europe


FCC ID: 2ANLH-X6100

WHAT’S NEW FROM X5105 TO X6100?

1. Analog – SDR Radio
Software-defined radio (SDR) system uses software for the modulation and demodulation of radio signals. Processing via a computer or other digital devices with software, the X6100 can provide you more info in real-time, complete complex operations and process data faster.

2. 5W Upgrade to 10W High Power
From 5W to max 10W, the Xiegu X6100 is a more powerful RIG than the X5105. In general, a higher wattage allows for greater range. Working with the XPA125B power amplifier, the X6100 can meet your long-rang talking requirement.

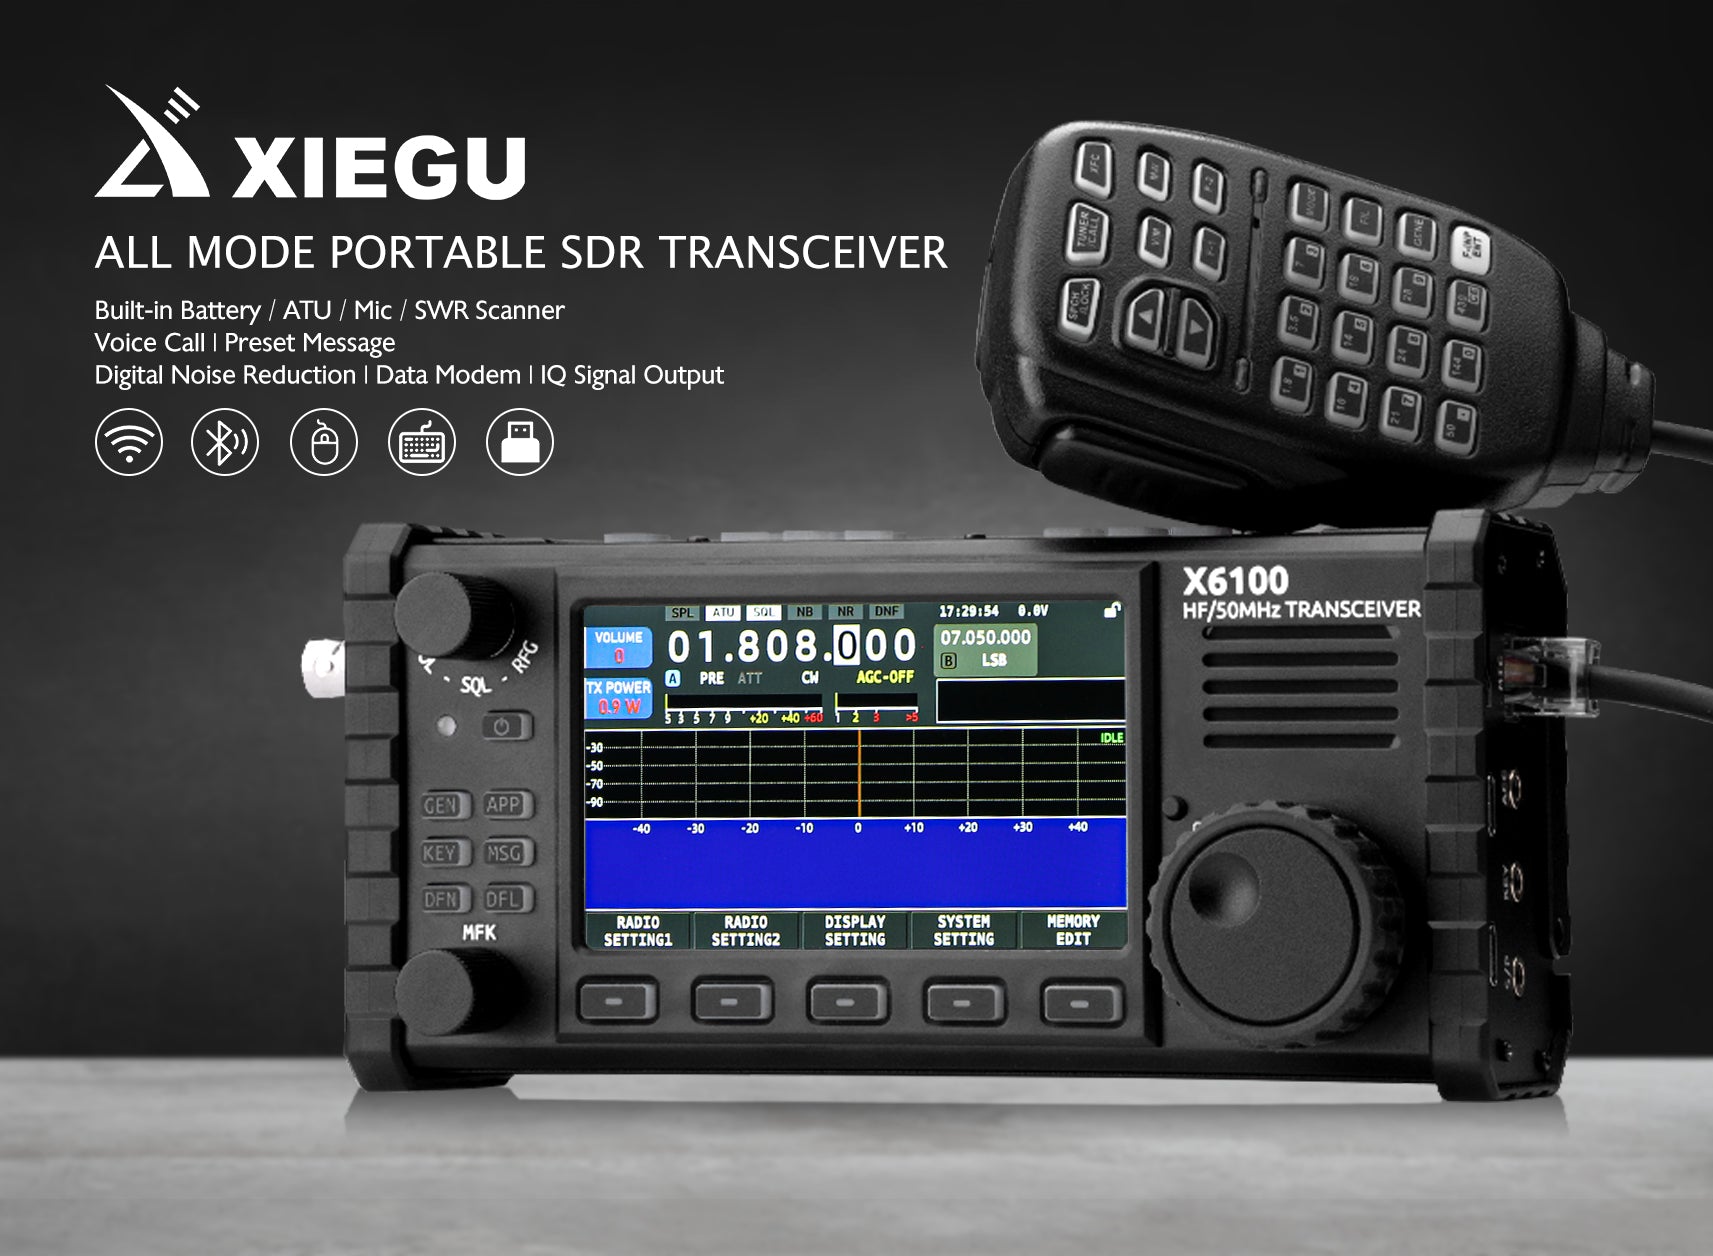
3. 3.6in LCD Screen - 4in Color Screen
The Xiegu X6100 HF transceiver comes with a 4-inch large color screen with 800*400 high resolution, helping you see all the important information at a glance.

4. Wireless Operation – Bluetooth, Wi-Fi, USB Host, Mouse, Keyboard Operation
In addition to traditional connecting ports to connect with extended devices , the Xiegu X6100 also supports modern connection methods like mouse and keyboard control via Bluetooth. 

5. Voice Call | Preset Message | Digital Noise Reduction | Data Modem | SWR Scanner

6. Built-in High-stability TCXO Internal Clock Source

◆ Warranty Note —— We provide a 18-month warranty on the Xiegu X6100 (was 12 months before September 14, 2022). As usual, if you modify the radio's hardware, the warranty is void. (The warranty is void right after you remove any part of the radio case without the agreement of our support team.) Note any firmware bugs or any other software-related issues are not under warranty.

◆ Disclaimer: No License is required to purchase this radio, nor to Monitor (listen) to the many Amateur (Ham) Radio frequencies. However, an FCC License is required to Transmit (Talk) on Amateur Radio Frequencies in the USA. Please visit http://wireless.fcc.gov/services/amateur/licensing to learn more.

CLICK HERE to get the latest firmware & > 130 pages extended user manual.


RELATED BLOG
How to Connect Xiegu X6100 to wfview Software?
wfview is a program developed by amateur radio enthusiasts running on recent versions of Linux, macOS, and Windows to control modern ham radios (basically Icom). It's a free and open source software using either a USB serial connection such as a keyboard, mouse, or touch screen interface or OEM network (ethernet or wifi) connection. Now Xiegu X6100 can work with it as well. This tutorial is to guide Xiegu X6100 users to connect to the wfview software.   Preparation 1. Make sure the X6100 firmware version is at least V1.1.7. 2. Download and install the wfview software. 3. Connect the radio station to WiFi (wireless) or use a network card to directly connect to the radio station's HOST port (wired). Note: Using HOST port connection is to solve the problem of poor WIFI signal and packet loss. Setting Steps 1. Run the radio station WFSERVER function: 1) Press SYSTEM SETTING on the main interface of the radio station 2) After entering the system settings, open the WFSERVER settings interface (use the MFK knob to select WFSERVER, then short press to confirm). 3) Run WFSERVER function: Short press the START key to run (after successful operation, a blue WF symbol will appear on the main interface). 2. To use WiFi wireless connection, you also need to enter the radio station WLAN settings function and configure the radio IP server address: 3. Open the installed wfview software and make the following settings 1) After opening the wfview software, click on "Settings" in the upper left corner to enter the settings interface, and then select "Radio Access" to make the following settings: Hostname(keynote) Control Port Username Password IP address assigned by the radio station Fill in according to the WFSERVER function settings in the radio station   2) Set up audio (according to your computer configuration): Audio Output Speaker/Headphone (Realtek High Definition Audio) Audio Input Microphone Array (Realtek High Definition Audio)   3. After setting up, click on "Connect to Radio" to connect to the radio station. 4. After connecting, a signal will appear in the spectrum display window of the main interface "View", indicating that the X6100 has established a correct connection with the computer. Problem Resolution 1. The delay is large, and the reason is that the WiFi signal is weak, so the radio station needs to be as close to the IP as possible or connected using a LAN port.    
Xiegu X6100 Firmware Upgrade (20230831)
New firmware version information is as follow after upgrade: (Enter the "SYSTEM SETTING---SYSTEM INFO" option, also can find the firmware version number) APP: V1.1.7 Aug 25 2023,15:09:46 BASE: V1.1.6 Mar 7 2023,09:57:03 Note: The radio must be connected to a 13.8v power supply in order to update the firmware. 2023.08.31 Upgrade Log | CLICK HERE to download. 1. Add wfserver. See <<Xiegu X6100 and wfview Software Connection Tutorial>> for more details. 2. Enable CAT "ECHO" mode. ------------------------------------------------------------------- 2023.08.07 Upgrade Log | CLICK HERE to download. 1. Add wfserver. See <<Xiegu X6100 and wfview Software Connection Tutorial>> for more details. Note from Radioddity: We have confirmed with Xiegu that the CAT control feature has been disabled in this firmware version. However, it will be available in the next release. Additionally, Xiegu plans to release their own control rules. ------------------------------------------------------------------- 2022.11.24 Upgrade Log | CLICK HERE to download. 1. Add CI-V instruction: 1A 01 (C1) (C2) C1: band index, See IC-705 CI-V Command Table C2: bandstack register number(not use), See IC-705 CI-V Command Table X6100 send back description FE FE # 2 byte, CI-V header E0 XX 1A 01 01 01 # 6 bytes, The command payload, XX is the rig's address 00 00 80 01 00 # 5 bytes, Operating frequency setting 03 02 # 2 bytes, Operating mode setting 00 # 1 byte, Data mode setting 00 # 1 byte, Duplex and Tone settings 00 # 1 byte, Digital squelch setting 00 08 85 # 3 bytes, Repeater tone frequency setting 00 08 85 # 3 bytes, Repeater tone frequency setting 00 00 23 # 3 bytes, DTCS code setting 00 # 1 byte, DV Digital code squelch setting 00 50 00 # 3 bytes, Duplex offset frequency setting 58 36 31 30 30 20 20 20 # 8 bytes, UR (Destination) call sign setting 20 20 20 20 20 20 20 20 # 8 bytes, R1 (Access repeater) call sign setting 20 20 20 20 20 20 20 20 # 8 bytes, R2 (Gateway/Link repeater) call sign setting FD # 1 byte, CI-V tail 2. Add CI-V instruction: 1A 06 (See IC-705 CI-V Command Table) 3. Add CI-V instruction: 21 00 21 01 21 02 (See IC-705 CI-V Command Table) 4. Add CI-V instruction: 26 (C1) (C2) (C3) (C4) C1: VFO index 0: Foreground VFO other: Background VFO C2: Operating mode See IC-705 CI-V Command Table C3: Data mode 0: OFF other: ON C4: Filter setting 1: FILTER1 2: FILTER2 3: FILTER3 other: Invalid *Note: [LSB/USB mode] with Data mode ON -> L-DIG/U-DIG [Other operating mode] with Data mode ON -> No effect 5. Add bluetooth SPP, virtual serial port for FLRIG, Omni-Rig or other CI-V based software 6. Fix the Fc marker bug in modem mode (there will be two markers in the audio FFT scope in some cases) 7. Optimize the fw updating process via sd card, the user data (configures, voices, channels) will not be cleared after updating 8. Some adjustments of the main window 8.1 Add LOCAL TIME / UTC TIME widget 8.2 Add RIT / XIT widget 8.3 Add audio oscilloscope 8.4 Add filter icon (shows filter group as will) 9. Add auto-level for the waterfall 10. Fix bluetooth issue (stuck in the startup screen or the bluetooth setting window) 11. Fix ntp update issue (make sure X6100 can access to the internet via built-in WiFi or USB to Ethernet dongle) 12. Show MAC address in the Bluetooth / WiFi setting windows (in the title of the window) 13. Optimize the TIME SETTING operation logic 14. Optimize the FFT SPAN (or FFT ZOOM), now it has four items: 100k,50k,25k,12.5k 15. Optimize the "Flat-Menu" operation logic, Press "MFK" to select the current item to the fast-access tag and return to the main window example 1: In "RADIO SETTING1" page, "TX POWER" is selected, press "MFK" then "TX POWER" is added to the fast-access tag example 2: In "DISPLAY SETTINGS" page, "FFT SPAM" is selected, press "MFK" then "FFT SPAM" is added to the fast-access tag *Note: "selected" means the item get the focus 16. Optimize AGC algorithm 16.1 AGC time constant is more accurate 16.2 Background noise is much lower without antenna plugged in (except FM mode) 17. Fix the bug: The main UI will crash sometimes after exit the "BLUETOOTH SETTING MENU" 18. Fix the bug: Charger sometimes won't work Tips & Note: #### Most of the CI-V instructions compatible with ICOM-705 #### Ham Radio Deluxe may not recognize the bluetooth virtual serial port #### Serial port remap (could be critial when working with the bluetooth virtual serial port): Why remap: FLRIG/WSJTDX/JTDX may fail to connect to the bluetooth virtual serial port (due to the mechanism of rfcomm itself) Roadmap and Tools: com0com: 1) install com0com 2) Run "Setup Command Prompt" (the CLI for com0com) install protname=COMxxx - xxx is the port number, choose a unoccupied one, for example: 88 3) Close the CLI hub4com: 1) Enter hub4com dir, looks like this: X:\hub4com-2.1.0.0-386> 2) Input the command in the MS CLI hub4com --route=All:All \\.\COMyyy \\.\CNCB0 COMyyy is the bluetooth virtual serial port number, for example: COM4 hub4com --route=All:All \\.\COM4 \\.\CNCB0 The CLI's output should be look like the below: COM4 Open("\\.COM4", baud=19200, data=8, parity=no, stop=1, octs=on, odsr=off, ox=off, ix=off, idsr=off, ito=0) - OK CNCB0 Open("\\.CNCB0", baud=19200, data=8, parity=no, stop=1, octs=on, odsr=off, ox=off, ix=off, idsr=off, ito=0) - OK Route data COM4(0) --> CNCB0(1) Route data CNCB0(1) --> COM4(0) Route flow control COM4(0) --> CNCB0(1) Route flow control CNCB0(1) --> COM4(0) Started COM3(0) Started CNCB0(1) FLRIG/WSJTDX/JTDX: 1) Com port for CI-V should be the one we choose in the com0com, which in this case would be COM88   ------------------------------------------------------------------- 2022.11.04 Upgrade Log | CLICK HERE to download. 1. Add CI-V instruction: 1A 01 (C1) (C2) C1: band index, See IC-705 CI-V Command Table C2: bandstack register number(not use), See IC-705 CI-V Command Table X6100 send back description FE FE # 2 byte, CI-V header E0 XX 1A 01 01 01 # 6 bytes, The command payload, XX is the rig's address 00 00 80 01 00 # 5 bytes, Operating frequency setting 03 02 # 2 bytes, Operating mode setting 00 # 1 byte, Data mode setting 00 # 1 byte, Duplex and Tone settings 00 # 1 byte, Digital squelch setting 00 08 85 # 3 bytes, Repeater tone frequency setting 00 08 85 # 3 bytes, Repeater tone frequency setting 00 00 23 # 3 bytes, DTCS code setting 00 # 1 byte, DV Digital code squelch setting 00 50 00 # 3 bytes, Duplex offset frequency setting 58 36 31 30 30 20 20 20 # 8 bytes, UR (Destination) call sign setting 20 20 20 20 20 20 20 20 # 8 bytes, R1 (Access repeater) call sign setting 20 20 20 20 20 20 20 20 # 8 bytes, R2 (Gateway/Link repeater) call sign setting FD # 1 byte, CI-V tail 2. Add CI-V instruction: 1A 06 (See IC-705 CI-V Command Table) 3. Add CI-V instruction: 21 00 21 01 21 02 (See IC-705 CI-V Command Table) 4. Add CI-V instruction: 26 (C1) (C2) (C3) (C4) C1: VFO index 0: Foreground VFO other: Background VFO C2: Operating mode See IC-705 CI-V Command Table C3: Data mode 0: OFF other: ON C4: Filter setting 1: FILTER1 2: FILTER2 3: FILTER3 other: Invalid *Note: [LSB/USB mode] with Data mode ON -> L-DIG/U-DIG [Other operating mode] with Data mode ON -> No effect 5. Add bluetooth SPP, virtual serial port for FLRIG, Omni-Rig or other CI-V based software 6. Fix the Fc marker bug in modem mode (there will be two markers in the audio FFT scope in some cases) 7. Optimize the fw updating process via sd card, the user data (configures, voices, channels) will not be cleared after updating 8. Some adjustments of the main window 8.1 Add LOCAL TIME / UTC TIME widget 8.2 Add RIT / XIT widget 8.3 Add audio oscilloscope 8.4 Add filter icon (shows filter group as will) 9. Add auto-level for the waterfall 10. Fix bluetooth issue (stuck in the startup screen or the bluetooth setting window) 11. Fix ntp update issue (make sure X6100 can access to the internet via built-in WiFi or USB to Ethernet dongle) 12. Show MAC address in the Bluetooth / WiFi setting windows (in the title of the window) 13. Optimize the TIME SETTING operation logic 14. Optimize the FFT SPAN (or FFT ZOOM), now it has four items: 100k,50k,25k,12.5k 15. Optimize the "Flat-Menu" operation logic, Press "MFK" to select the current item to the fast-access tag and return to the main window example 1: In "RADIO SETTING1" page, "TX POWER" is selected, press "MFK" then "TX POWER" is added to the fast-access tag example 2: In "DISPLAY SETTINGS" page, "FFT SPAM" is selected, press "MFK" then "FFT SPAM" is added to the fast-access tag *Note: "selected" means the item get the focus 16. Optimize AGC algorithm 16.1 AGC time constant is more accurate 16.2 Background noise is much lower without antenna plugged in (except FM mode) Tips & Note: #### Most of the CI-V instructions compatible with ICOM-705 #### Ham Radio Deluxe may not recognize the bluetooth virtual serial port #### Serial port remap (could be critial when working with the bluetooth virtual serial port): Why remap: FLRIG/WSJTDX/JTDX may fail to connect to the bluetooth virtual serial port (due to the mechanism of rfcomm itself   ------------------------------------------------------------------- 2022.04.18 Upgrade Log | CLICK HERE to download. App: V1.1.5 Apr 10 2022,13:12:01 1. Fix bug: the last character in the string of "AGC mode" is half cut off in MEMO mode 2. Fix bug: CW decoder not working 3. Fix bug: incorrect UTC offset/Time zone 4. Change the range of built-in/handheld speaker's MIC gain: Old version: range 0~36, default 10; actual gain 0~+18dB, step 0.5dB This version: range 0~50, default 20; actual gain -10~+15dB, step 0.5dB Base: V1.1.5 Apr 9 2022,17:14:40 1. Fix bug: battery can't be fully charged 2. Fix bug: won't charge at power off state (occasionally) 3. Fix bug: have to switch band or press PTT once at the first time of power up, or there's no output RF power 4. Fix the problem that the built-in/handheld speaker's MIC gain is too high 5. Fixed the problem that the gain adjustment of the built-in/handheld speaker is not obvious   ------------------------------------------------------------------- 2022.02.19 Upgrade Log | CLICK HERE to download. App: V1.1.4 Feb 16 2022,17:15:50 1. Add FFT peak hold switch, GEN > DISPLAY SETTING > FFT PK HOLD 2. Fix bug "Gate Way" can't save in "WLAN" setting page 3. Change rx volume from 0-50 to 0-55(5dB more than prev version) 4. Change CW decoder's threshold to a higher level(better robustness but needs higher SNR) 5. Calibrate the RX S-Meter giving more accuracy 6. Add ALC level indicator(at the top-right of the bandscope area, below the tx power strings) 7. Optimize the Fw flashing logic(base board will boot-up itself after flashed the Fw) Base: V1.1.4 Feb 15 2022,13:19:59 1. Fix bug built-in MIC feedback to speaker sometimes 2. Fix bug base board some times not booting at power on 3. Optimize ALC algorithm 4. Optimize SWR algorithm, less jumping around 5. Optimize switching power synchronization algorithm, less birdies Tips: ☆ ALC tricks a) ALC level equ to 0: over driving, decrease input signal level b) ALC level equ to 100: under driving, increase input signal level c) When doing Digi,the audio baseband signals are almost constant amplitude, adjust the soundcard volume to make ALC level between 20-80 to get good linearity ------------------------------------------------------------------- 2022.01.25 Upgrade Log | CLICK HERE to download. App: Version V1.1.3 Jan 15 2022,14:48:38 1. Correct the problem of wrong frequency division of 6m (original division: 50.1M~54.0M, modified to: 50.0M~54.0M) 2. The conditions of low-battery shutdown are modified to: battery <10% and voltage lower than 7.3V to prevent low-battery shutdown by mistake when the fuel gauge is not calibrated. Base: Version number V1.1.3 Jan 25 2022,14:21:03 1. Fix the problem that the RTS signal of the CI-V/CAT port could not control the CW transmission Tips: ☆ The CAT/CI-V port can be viewed in the device manager, generally called USB-Enhanced-SERIAL-B CH342 (COMx) Where COMx is the port number, x is a number, such as: COM3 If you find that you can't connect it, you can try to connect via the corresponding port number of USB-Enhanced-SERIAL-A CH342. ☆ How to use N1MM Logger+ to send CW: Config->Configure Ports, Mode Control, Winkey, etc... The first page in the pop-up menu [Hardware] Port drop-down box to select COMx Radio drop-down box to select IC-7000 Digi remove the tick CW/Other checkmark Click Details/Set, and set in turn: Speed=19200,Parity=N,DataBits=8,StopBits=1 DTR(pin 4)=Always off,RTS(pin 7)=CW The rest are all defaults, click OK ------------------------------------------------------------------- 2022.01.17 Upgrade Log | CLICK HERE to download. APP : V1.1.2 Jan 17 2022,16:31:45 BASE : V1.1.2 Jan 17 2022,15:44:18 1. In-machine coulometer is enabled to manage battery cell. After the upgrade, the battery capacity, rather than battery voltage, measured by the coulometer is taken as management data. Precautions are as follows: 1.1) After upgrading firmware, please fully charge and discharge the battery for successive 4 times, after which the measurement of the coulometer will be accurate. After just upgrading the firmware, the error of electric quantity displayed is large before the 4 charges and discharges as mentioned above, so it can be ignored. The charging process shall be kept continuous until the charging instruction indicates it has been completed, which is conducive to the accurate measurement of the capacity by the coulometer. 1.2) The status of the upgraded charging indicator light is as follows: Flashing: charging Normally on: charging completed Off: once the charging option is disabled in the menu, the indicator light will not be off. 1.3) When the electric quantity is below 10% after the upgrade, the battery icon is displayed in red with an empty interior, and the device will automatically shut down. 1.4) Battery voltage is no longer taken as the basis of low power. 2. Parameter adjustment in GEN menu is changed to non-circulating, which can be switch by rotating the large knob to left or right. 3. DFL menu logic is fixed. Press other menus to exit after entering DFL menu. 4. Preset message transmission function is added (available for W, PS and RTTY). 5. CW decoding algorithm is adjusted. 6. Start screen is changed to LOGO+model. 7. Bluetooth device connection logic is optimized (there has been feedback about poor compatibility with Windows 10/11 64bit drivers). 8. The problem that label of axis X scanned by SWR does not upgrade is fixed. 9. The bandwidth of first group of filter of SSB is widened to 50-2950Hz(2.9k). 10. The problem of save failure after adjusting the filter is fixed. 11. Indicator string under AGC mode is simplified to AGC-A,AGC-F,AGC-S,AGC--. 12. Indicator string 'FIL-X' of current filter bank is added, which is below VFO frequency. 13. LSB-DIG and USB-DIG strings are simplified to L-DIG and U-DIG. 14. Hand microphone button function is enabled. 14.1) SPCH/LOCK: short press=lock/unlock larger impeller; long press=none 14.2) TUNER/CALL: short press=switch on/disconnect automatic antenna tuner; long press=enable automatic antenna tuner 14.3) XFC: short press=switch VFO A/B; long press=copy VFO from foreground to background 14.4) V/M: short press=switch VFO/MEMO mode; long press=none 14.5) MW: short press=save VFO to current channel number; long press=none 14.6) MODE: short press=LSB->L-DIG->USB->U-DIG->CW->CWR->AM->NFM circulation; long press=none 14.7) FIL: short press=FIL1->FIL2->FIL3 circulation; long press=none 14.8) UP: frequency+stepping position under VFO mode; next channel under channel mode 14.9) DOWN: frequency-stepping position under VFO mode; last channel under channel mode 14.10) F1/F2: allow setting custom functions in RADIO SETTING2 15. Standingwave meter fluctuation under no power and low power conditions is fixed. 16. Maximum output power under external power supply condition is improved. 17. System startup sequence is optimized. 18. NR algorithm is optimized. 19. System data structure is optimized. 20. Display screen backlight adjustment level is optimized. There are 5 levels available when using battery and 10 levels available when using external power supply. ------------------------------------------------------------------- 2021.12.30 Upgrade Log | CLICK HERE to download. App: Version number V1.1.2 Dec 30 2021,16:36:55 1. The frequency adjustment step is changed to 10, 100, 1000 Hz cycle. 2. The spectrum bandwidth is changed to 100kHz, 50kHz is adjustable in two levels. 3. Improved the Bluetooth scanning speed and shortened the time to scan peripheral devices after turning on Bluetooth. 4. Fixed the problem that the WIFI IP address and gateway address could not be displayed correctly. Base: Version number V1.1.2 Dec 30 2021,15:37:48 1. Improved NR performance,the noise caused by the NR algorithm itself is eliminated. 2. Improved ALC performance,CW performance is improved. ------------------------------------------------------------------- 2021.12.29 Upgrade Log | CLICK HERE to download APP : V1.1.0 Dec 28 2021,11:51:46 BASE : V1.1.0 Dec 27 2021,14:28:55 1. Added WIFI function 2. Added Bluetooth function 3. Fixed the bug that can not save the user selected filter group(1,2,3) 4. Optimized the ALC algorithm and corrected the problem of power rise slow. 5. Optimized the system settings. Wi-Fi Operation Instructions SCAN button: Scan for nearby hotspots (Access Point) CONNECT/DISCONNECT: Connect/disconnect the hotspot in the list left. EDIT: Edit the element be selected by the orange-focused object on the right. CONFIG: The orange-focused object on the right selects the next one. EXIT: Exit the interface.   BluetoothOperation Instructions OFF/ON: Turn on/off the built-in Bluetooth adapter. CONNECT/DISCONNECT: Connect/disconnect the Bluetooth device be selected in the list on the left. EXIT: Exit the interface. Note: When the built-in Bluetooth adapter is displayed as "ON", it will always scan the surrounding Bluetooth devices. ------------------------------------------------------------------- New firmware version information is as follow after upgrade: APP : V1.1.0 Dec 6 2021,17:55:07 BASE : V1.1.0 Dec 7 2021,14:40:18 2021.12.07 Upgrade Log | CLICK HERE to download 1. Optimize the system audio configuration to eliminate distortion at high volume. 2. Optimized the frequency spectrum display effect and optimized the automatic adjustment function of the reference level. 3. Fixed the issue of the indicator light when radio is charging when turned off. 4. Fixed the issue of the antenna tunner. 5. Fixed the issue that unable to adjust the internal and external microphone volume. 6. Added 3 levels of spectrum bandwidth adjustment function. 7. Added low battery reminder function. 8. Added kHz bit adjustment, clear the bits of 100 Hz and below.  
Xiegu X6100 Battery Charging Questions and Answers
One of the Radioddity customers posed these well-thought-out questions about the Xiegu X6100 battery charging system and procedures. These are important issues that every X6100 owner should be aware of. 1. Can the X6100 be left connected permanently to an external charger or external source of dc power with the charger turned off? Yes, it can be left connected. The Green LED will show activity if the Charger has not been toggled Off in the Radio Setting1 Menu. 2. Can or should the X6100 be operated from an external power source with the charger turned off? Yes, as long as the Charger is toggled off in the Radio Setting 1 Menu, there is no problem running from an external power source. (13.8 VDC @ 3.4 Amps or above current capacity). The radio will operate from 9 to 15 VDC with current capacity requirements increased at a lower voltage than 13.8 VDC and reduced above 13.8VDC up to 15 VDC. 3. When should the charger be turned off? The Charger should be used with the radio powered off. The Battery Management System (BMS) will start with a constant current charge that is indicated by a flashing Green LED. When the current demand from the battery tapers down to a steady low current set point, the charge state shifts to Constant Voltage for the 'finishing charge'. During this charging state, the Green LED will glow constantly. It is during this charging state that the 2 cells should be balanced-charged to their maximum of 4.2 VDC. The LED (in theory) should turn off when this state is completed, but there may be a conflict between the actual indicator of the completed charge and the LED Staying on to remind that the charger is still connected. I would recommend charging overnight, then toggling the charger back off in the System Setting1 Menu. 4. When should the charger be turned on? The BMS will monitor battery capacity and voltage. It has voltage set points to first disable transmit capability and a 2nd set point to power the radio down to prevent the battery from being discharged below the point it can properly accept a charge. At this point, the charger should be enabled. During the first 4 charge /discharge cycles, you should charge fully and let the radio discharge the battery until the BMS shuts it down. After that, the battery has been 'built' to its rated current capacity and is more tolerant to partial charge cycles to top off a charge before the radio BMS shuts it down. The battery has a projected set number of charge/discharge cycles, so partial charging should be avoided if possible. 5. Does operating X6100 from an external power source with charger turned off affect the internal batteries of the X6100? There should be no effect on the battery when the charger is off as indicated by the lack of the Green LED activity. I have not tried to generate a test setup to check for any current draw in milliamps or microamps to confirm this. There is no heat felt when the charger is off, and the radio remains connected to an external power source. 6. When operating the X6100 from an external power source to boost the output wattage should the charger be turned on or off? The Charger should always be turned off when the radio is being operated; even for receive only. When the battery is under load, the BMS cannot sense a reduction in current demand. If used un-squelched, or for transmitting, the BMS only senses a rise in the current demand. This can cause excessive heat when the heat from the Power Amplifier (PA) components internal to the radio is combined with heat from the BMS circuit / Battery pack combination. The radio uses Passive Cooling (no cooling fan). The surface area of the outer case can dissipate heat from normal operations. Constant, or near constant carrier modes like FT8 (or other digital sound card modes), as well as CW and RTTY, place a higher demand on the PA section of the radio. The by-product is heating. Add the additional heat build-up from the charger circuit and the heat can become excessive. Combine this further with working in direct or near direct sunlight and the radio may shut down. Should you have any question about Xiegu X6100, be free to CLICK HERE to contact us. We'll try our best to help.
What is HF radio?
  What is HF radio? Known as the decameter band or decameter wave, high frequency (HF) is the ITU designation[1] for the range of radio frequency electromagnetic waves (radio waves) between 3 and 30 megahertz (MHz). The HF band is a major part of the shortwave band of frequencies, so communication at these frequencies is often called shortwave radio. Because radio waves in this band can be reflected back to Earth by the ionosphere layer in the atmosphere – a method known as "skip" or "skywave" propagation – these frequencies are suitable for long-distance communication across intercontinental distances. The band is used by international shortwave broadcasting stations (2.310 - 25.820 MHz), aviation communication, government time stations, weather stations, amateur radio and citizens band services, among other uses. Different from VHF (Very High Frequency - 30MHz-300MHz) and UHF (Ultra High Frequency - 300MHz-3GHz) radios, HF radios cover far greater distances thanks to ionospheric refraction – but the HF radio signals are prone to distortion by atmospheric conditions such as geomagnetic storms or solar flares that radio users cannot control. HF communications are best suited for long distance communication between ground operators and base stations. Some HF radios normally cover HF band only, like the Xiegu G106, Xiegu G90, Xiegu X6100.   What about VHF/UHF radios? VHF radio waves operate in a band between 30-300 megahertz, while UHF radio signals are propagated within 300 megahertz and 3 gigahertz. These radio waves travel over line of sight, making them ideal for local communications over a few kilometres. Indeed, VHF radio waves normally travel within line of sight along the Earth’s surface. Common uses for VHF are FM radio broadcasting, television broadcasting, two way land mobile radio systems (emergency, business, private use and military), long range data communication up to several tens of kilometres with radio modems, amateur radio, and marine communications. Air traffic control communications and air navigation systems (e.g. VOR, DME & ILS) work at distances of 100 kilometres or more to aircraft at cruising altitude. VHF was used for analog television stations in the US, and continues to be used for digital television. UHF radio waves propagate mainly by line of sight; they are blocked by hills and large buildings although the transmission through building walls is strong enough for indoor reception. One of the biggest pros of UHF radios is that they do a much better job of penetrating barriers in urban locations, like concrete, steel, and wood. So this kind of radio is best suited for use indoors, including buildings with multiple floors, in industries such as manufacturing, distribution, education, retail, hospitality, and healthcare. They also work well for businesses that function in both indoor and outdoor settings, where there are a lot of surrounding buildings. Nowadays, some radios are capable of transmitting on both VHF & UHF bands, like Radioddity GS-5B, making it meet more outdoor and indoor activities requirements. There are also some dual-band radios featuring 10W high power like Radioddity GA-510, supporting a longer range of communication.   US Amateur Radio Bands Reference - SOUCE    
How to Activate Wifi & Bluetooth Function for Xiegu X6100?
Before activate the Wifi & Bluetooth function, please make sure your Xiegu X6100 have been updated at least to the new firmware 20211229. CLICK HERE to learn different versions' firmware update log. WIFI Operation Instructions SCAN: Scan for nearby Wi-Fi / hotspots (Access Point) CONNECT/DISCONNECT: Connect/disconnect the hotspot in the left list. EDIT: Edit the element selected by the orange box on the right. CONFIG: Move the orange box to the next. EXIT: Exit the interface.   1. SYSTEM SETTING – WLAN – press MFK knob to enter the Wi-Fi setting interface ➟ ➟ 2. Select a Wi-Fi to connect by rotating MFK – press CONFIG ➟ 3. Press CONFIG to move to password – press EDIT to pop up the digital keyboard ➟   4. Enter/delete password by rotating & press MFK knob   5. Click ENTER by rotating & press MFK knob to confirm password (important)   6. Press EDIT to exit the digital keyboard   7. Press CONNECT, please wait for about 10s   8. WiFi connected!   9. Press EXIT to exit the Wi-Fi interface   10. Wi-Fi connected confirmed!   --- --- --- --- --- --- --- --- --- ---   Bluetooth Operation Instructions OFF/ON: Turn on/off the built-in Bluetooth function. CONNECT/DISCONNECT: Connect/disconnect the selected Bluetooth device on the left. EXIT: Exit the interface. Note: When the built-in Bluetooth function is displayed as "ON", it will always scan the surrounding Bluetooth devices.   1. SYSTEM SETTING – BLUETOOTH – press MFK knob to enter the Bluetooth setting interface (for the first time, it should take about 1 minute to scan Bluetooth device, please be patient; will be 5s only from second time.) ➟ ➟ 2. Select a Bluetooth device by rotating MFK – press CONNECT to connect (please make sure your Bluetooth device is on) ➟ 3. Bluetooth connected! 4. Press EXIT to exit the Bluetooth interface  
Xiegu XPA125B Preparation Before Using X6100 X5105 or G90
The Xiegu XPA125B is a 100W PA and ATU all-in-one device for the Xiegu series radios. It helps fast build an up to 100W high-power shortwave transceiver with the Xiegu radios like the G90, X6100, X5105, G1M, etc. For most radios of Xiegu, you may need a CE-19 adapter to connect, while an L4001 cable for the Xiegu X6100. You can also make it work with Yaesu FT-817 or FT-818 with a CN-20 adapter. Below we provide guidance on XPA125B preparation before using X6100, X5105 or G90. For Xiegu X6100 Please follow the XPA125B Preparation steps below before transmitting: The Autotuner requires a constant carrier to tune properly. An SSB transmission does not provide this. 1. Select the band you want to operate on 2. Verify the XPA125B Band is the same as the X6100 3. Switch the X6100 to AM and set the output power to maximum 4. Press the PA switch on the XPA125B (if necessary) to return RX to OFF 5. Toggle the X6100 tuner to OFF (If Necessary) 6. Key the Mic 7. Verify that the radio is not operating in the Split mode unless operating on the same band for transmit and receive. 8. Long Press the XPA125B ATU button to initiate an antenna match 9. Unkey the Mic when the matching session is completed 10. Set the X6100 output power to 5 watts (not greater than 8 watts when using SSB using a power supply) 11. Toggle the XPA125B PA to ON 12. Switch X6100 to SSB The XPA125B is now matching the antenna for the band and is ready to operate. --- --- --- --- --- --- For Xiegu G90 Please follow the XPA125B Preparation steps below before transmitting: The Autotuner requires a constant carrier to tune properly. An SSB transmission does not provide this. 1. Select the band you want to operate on 2. Verify the XPA125B Band is the same as the G90 3. Switch the G90 to AM and set the output power to maximum 4. Press the PA switch on the XPA125B (if necessary) to return RX to OFF 5. Toggle the G90 tuner to OFF (If Necessary) 6. Key the Mic 7. Verify that the radio is not operating in the Split mode unless operating on the same band for transmit and receive. 8. Long Press the XPA125B ATU button to initiate an antenna match 9. Unkey the Mic when the matching session is completed 10. Set the G90 output power to 5 watts (not greater than 8 watts when using SSB using a power supply) 11. Toggle the XPA125B PA to ON 12. Switch G90 to SSB The XPA125B is now matching the antenna for the band and is ready to operate. --- --- --- --- --- --- For Xiegu X5105 Please follow the XPA125B Preparationsteps below before transmitting: The Autotuner requires a constant carrier to tune properly. An SSB transmission does not provide this. 1. Select the band you want to operate on 2. Verify the XPA125B Band is the same as the X5105 3. Switch the X5105 to AM and set the output power to maximum 4. Press the PA switch on the XPA125B (if necessary) to return RX to OFF 5. Toggle the X5105 tuner to OFF (If Necessary) 6. Key the Mic 7. Verify that the radio is not operating in the Split mode unless operating on the same band for transmit and receive. 8. Long Press the XPA125B ATU button to initiate an antenna match 9. Unkey the Mic when the matching session is completed 10. Set the X5105 output power to 5 watts 11. Toggle the XPA125B PA to ON 12. Switch X5105 to SSB The XPA125B is now matching the antenna for the band and is ready to operate.

1940_x.jpg 1940_x.jpg


LATEST FIRMWARE: 2022.11.24 | CLICK HERE to learn about all the update logs.

--- --- --- ---

X6100 is an ultra-portable shortwave transceiver. It adopts the SDR software radio platform architecture of excellent performance, which carries powerful baseband and RF unit, integrating rich and diversified operating functions, bringing you a brand-new recognition and experience on amateur radio. With its compact structure and tiny appearance, you can immediately set forth on a journey with it, get close to nature and enjoy the fun of outdoor communication.
 

Features:
- SDR Structure
- HF/50MHz Full Mode (supporting data communication)
- Transmitting Power: External power supply: 10W | Battery power supply: 5W
- 4" (3.46 x 2.13in) High-resolution Color Screen, 800*480
- Built-in 3000mAh Rechargeable Lithium Battery
- Built-in Automatic Antenna Tuner
- Integrated SWR Scanner & Voice Call
- Integrated Modem, Preset message, CW Automatic Call
- Built-in Bluetooth/Wifi function, enable wireless audio/keyboard/mouse operation
- Integrated USB control/transmission, supports USB HOST
- Built-in high-stability TCXO internal clock source


# Specifications
Frequency Receiving: 0.5MHz~30MHz | 50MHz~54MHz
Frequency Transmitting: 1.8~2.0MHz | 3.5~4.0MHz* | 5.3MHz (60 Meters)
7.0~7.3MHz* | 10.1~10.15MHz
14.0~14.35MHz | 18.068~18.168MHz
21.0~21.45MHz | 24.89~24.99MHz
28.0~29.7MHz | 50.00~53.99MHz
Operation Mode: USB/LSB (J3E), CW (A1A), FM (F3E), RTTY(F1B), AM (A3E)
Minimum Frequency step: 10Hz
Frequency Stability: ±1.5ppm
External Power Supply Voltage: DC 9.0V~15.0V, negative ground
Frequency Stability ±1ppm (20 minutes after start)
Antenna Port Impedance 50Ω
Antenna Interface Type BNC
Working Temperature: 0℃~+55℃
Transmission power: External power supply: 10W | Battery power supply: 5W
Current consumption: Standby: 330mA (Max) | Transmit: 3A (Max)
Overall dimensions: About 7.1*3.4*2in | 180*86*49mm
# Antenna Tuner
VSWR: 1:4.5
First tuning time: ≤15s
Memory load tuning: ≤0.2s
# Transmitter
Microphone Impedance: 200~10kΩ (600Ω in general)
Transmitting Power: 10W (SSB/CW/FM) @13.8VDC
5W (SSB/CW/FM) @battery
2.5W (AM) @13.8VDC
1.5W (AM) @battery
Stray Suppression: 1.8~29.6MHz: ≥50dB | 50~54MHz: ≥60dB
Sideband Suppression: ≥50dB
Microphone Impedance: 200~10kΩ (600Ω in general)
# Receiver
Circuit Type: ZIF
Sideband Suppression: ≥50dB
MDS: -138dB
# Wireless Network/Bluetooth
Wireless LAN standard: IEEE802.11b/g/n
Authentication and encryption: WEP (64/128bit)
WPA (TKIP)
WPA2 (AES)
Frequency band: 2.4G
Bluetooth version: 4.0
   

*Note:
1. The 80-meter or 3.5 MHz band is a band of radio frequencies allocated for amateur radio use, from 3.5 to 4.0 MHz in IARU Region 2 (consisting mostly of North and South America), and generally 3.5 to 3.8 or 3.9 MHz in Regions 1 and 3 (the rest of the world) respectively.
2. The 40-meter or 7-MHz band is an amateur radio frequency band, spanning 7.000-7.300 MHz in ITU Region 2, and 7.000-7.200 MHz in Regions 1 & 3.


Band/Mode SSB/CW FM AM
0.5~1.79999MHz / / 10uV
1.8~1.99999MHz 0.35uV / 10uV
2.0~27.9999MHz 0.20uV / 2uV
28.0~30.0MHz 0.20uV 0.22uV 2uV
50.0 ~ 54.0MHz 0.20uV 0.22uV 2uV


Note that the center pin is positive.
Note that as for the included power cable, the white one is positive and black one is negative.
 

What’s in the box?
1 x Xiegu X6100 Transceiver
1 x USB Type-C Data Cable
1 x Multi-function Speaker Mic
1 x Power Adapter
1 x Charging Cable
1 x User Manual
 

How to connect X6100 to XPA125B Amplifier?

X6100_TO_XPA125B.png

X6100 can expand the output power to 100W when connected to the XPA125B power amplifier through a L4001 cable (not included).

After connection, X6100 can automatically control the band switching of XPA125B. At the same time, ALC control will be established between the two machines. When the power output from X6100 to XPA125B exceeds the limit, it will be automatically reduced, so that the output power of XPA125B is constant at about 100W.

We recommend you set the output power of X6100 to ≤2.5W to protect the power amplifier equipment.
 

Recommended Accessories (not included in the package)
1. Xiegu XPA125B 100W Power Amplifier & L4001 Cable
2.
Xiegu GNR1 Digital Audio Noise Filter
3. Xiegu VG4 40m/20m/15m/10m 4-band Vertical Antenna
4. Xiegu GY03 External Stereo Speaker   
5. Raddy Multi-function Backpack
6. Xiegu DH100 100W Portable Power Station
7. Radioddity PB3 Carrying Case
8. Radioddity X6100-H1 Protective Bracket
9. Xiegu X6100 Spare Parts Kit


1 Year and 6 months
Manufacturer's Warranty.
• This warranty from Radioddity covers all new items (except Xiegu brand) purchased from radioddity.com. For purchases made through other platforms like Amazon, eBay, and Walmart, we offer a 1-year warranty period from the date of purchase. The specific warranty terms may vary depending on the authorized dealer.
• This warranty cannot be transferred. You need to provide proof of purchase from us or an authorized dealer to avail warranty service.
• For Xiegu brand items, we offer a 1.5-year warranty for the G90, X6100, and X5105 models starting from September 14, 2022. All other models come with a 1-year warranty.


What Does This Limited Warranty Cover?

We warrant that the Products are free from defects in materials and workmanship under normal use and use in accordance with the respective Product user manual, during the Warranty Period. Please refer to the Instructions inside each package for a description of proper use and care of the unit.


What Does This Limited Warranty Not Cover?

This limited warranty does not cover damages directly or indirectly arising or resulting from or during:

(1) accident, misuse, abuse, vandalism or acts of God (including lightning and other weather conditions)

(2) use with another product or other damage or loss suffered by the use or combination of any other item

(3) improper or inadequate maintenance

(4) repairs by an unauthorized service technician

(5) normal wear and tear
 

Open Box

Open Box items are products that have damaged packaging or are otherwise not suitable to be sold as new. All items are tested to be working by a member of our team.

Open Box items come with a 6-month warranty instead of the standard 18 months warranty and are not eligible for any warranty extension offered to new products. We will not accept returns of Open Box items due to cosmetic damage or other non-performance-related issues. All sales of Open Box items are final and not eligible for a return or refund.

If for some reason the item is defective on arrival, please contact
support@radioddity.com so we can arrange a replacement.


If you are satisfied with our products and service, please kindly leave us a positive product review. Any problem, be free to contact us support@radioddity.com
We strive to answer all emails as quickly as possible, but due to high email volume, it may take time for us to reply. Thanks in advance for your patience!

Order Processing

All orders are processed within 1-2 business days after we receive your full payment, excluding weekends and holidays.

As soon as your order is ready, we’ll update the tracking number and send it to you if you’re a Radioddity Member. We highly recommend that you register as a Radioddity Member here. If the item you ordered is temporarily out of stock, our customer service team will reach out to you. You can choose to wait until the item is back in stock or cancel your order.

Please be aware that we have several distribution centers globally. Therefore, your orders may be shipped from various locations including the United States, Canada, Europe, or China, depending on the availability of the product in our inventory.
 

Flat Shipping Rates
 

Country

US

EU

Outside US & EU

  Free when order amount ≥ $99.99 Free when order amount ≥ $99.99 Free when order amount ≥ $99.99

Flat fee

$9.99

$9.99

$9.99

Ship from

➤ United States
➤ China

➤ Germany
➤ China

➤ China

Handling time 1-2 business days 1-2 business days 1-2 business days

Delivery time

5-7 business days

5-7 business days

7-15 business days

Note:

1. Customs fee included for US & EU countries.

2. Please note that taxes will be applied to shipping rates. These taxes will be calculated and added to your total at checkout.

3. US Shipping does not include Alaska, Hawaii and Puerto Rico area. Please contact us for a detailed shipping fee to these areas.

4. For EU countries, please be aware that the listed product prices do not include VAT.

5. For shipping options to other countries, please visit our EXPANDED INTERNATIONAL SHIPPING page.

6. Please be aware that for outlet items, pre-orders, and open box items, the shipping services and charges may vary.
 

How Do I Change The Shipping Address Or Cancel My Order


Contact support@radioddity.com (CLICK HERE) immediately if you need to change the shipping address or cancel your order. Please be advised that some orders are shipped very soon after placement and it will not always be possible to make changes to the shipping address and/or cancel the order.


Frequently Asked Questions


1. What forms of payment do you accept?
Radioddity.com currently accepts PayPal* or credit card for all orders.
*When purchasing with PayPal, your shipping address will automatically default to the address on file with PayPal, regardless of the shipping address you enter on your Radioddity.com order.

2. Why has my credit card payment failed?
Payment with a credit card may fail because of bank authorization and fraud prevention systems. If you are having trouble making a payment via Credit Card, you may contact your card issuing bank or PayPal directly. Here are PayPal's phone numbers:
+1-888-221-1161 (US & Canada Toll Free) +1-888-215-5506 (US & Canada Toll Free)
+1-402-935-7733 (International) +1-402-935-2050 (International)

3. How do I know if it is safe to shop with you?
Radioddity.com takes great pride in offering a safe and secure online shopping experience. We also respect your privacy and we're committed to protecting it.

4. Is there any discount for bulk/volume purchases?
Radioddity does provide discounts for some bulk/volume purchases. Please email our customer service for more details.

5. Do you ship internationally?
Yes, we do! We ship to US & EU countries. For some products, we ship to CA.

6. How can I contact Radioddity.com for additional assistance?
Email Customer service:
please email us via support@radioddity.com, and we will respond to your email as quickly as possible, usually within 24-48 hours.

7. How are warranties handled?
Repairs on defective merchandise are handled by the manufacturers and not by Radioddity unless otherwise indicated. If any item arrives damaged due to shipping, immediately contact the courier. Keep all shipping materials and contact us immediately.

8. Why didn't I receive an order confirmation email after my PayPal payment is completed?
We send a confirmation email to your primary PayPal email address or the e-mail address you have specified if you used the "PayPal Express Checkout" method. Make sure that you have a Radioddity account registered under your PayPal account's primary e-mail address.
In rare circumstances, a technical bug confirmed by PayPal can get in the way. If you do not receive any information at all, and your order does not appear in your Radioddity account, please contact us and send us your order details.

9. How do I change the shipping address or cancel my order?
Please contact customer service immediately if you need to change the shipping address or cancel your order. Please be advised that some orders are shipped very soon after payment and it will not always be possible to make changes to the shipping address and/or cancel the order.

10. What does Radioddity.com charge for shipping order and how long will it be before I receive my order?
Please CLICK HERE to learn about our shipping policy.

11. Do you ship to PO boxes or Military APO/FPO addresses?
Only USPS can ship to both PO Boxes and Military APO/FPO addresses. The items have to be less than 2kg. Please allow additional time for orders to be shipped to these addresses. Express shipping cannot be sent to both PO Boxes and Military APO/FPO addresses.

12. Why am I unable to track my order?
It can sometimes take 24-48 hours or so for tracking information to update once an order has shipped from our warehouse.
Occasionally, a package may not receive the proper origin and transit scans while on its journey to you, so neither us nor express is able to track the exact location of the package in transit.
Please email us if you do not receive your order by the end of the quoted time frame. Please note that orders shipping via UPS can be delivered as late as 9:00 pm local time in some areas.

13. Taxes, Customs, & Duties
If the package is checked by your country's customs office when the item arrives in your country, most websites are declaring that you are responsible for import duties, tariffs, and taxes. However, Radioddity will be happy to go fifty-fifty with customers. Quality customer service is our highest value and we try our best to reduce our customer’s loss.

14. How do I return products if I am unsatisfied?
Please CLICK HERE to learn about our return policy.

15. What do I do if received the wrong item?
Return the wrong item. If the item you received is completely different from the one you ordered, please contact our Customer Service with photos or videos of the different product. If a return is necessary, replacement plus return shipping cost will be issued to you on receiving the returned product. Or if you decide to keep it, we will offer a 10% discount for buying it.

16. How do I return defective items?
If your product turns out to be a defective one with physical damage within 30 days from the initial receiving date. You can mail the item back in the original package without any wear and tear for a free replacement. However, you will need to provide photos and videos showing the defect(s) of the product.
*NOTE: We strongly recommend obtaining and saving your return tracking number until you are notified that we have completed your refund.*

17. When will a replacement be sent?
Replacements are treated the same way as that of new orders -- they typically arrive in 10 to 13 days. If a product needs to be returned for replacement, the replacement is sent after receiving the returned item.

18. How long does it take for me to get a refund?
It may take 1 or 2 weeks for your return to reach our warehouse. Once it is received and inspected (usually within 72 hours of arrival) your refund will be processed and automatically applied to your credit card or original method of payment within 2 days. Please note that depending on your credit card company, it may take additional 2-10 business days after your credit is applied for it to post to your account.

USD